Surface Determination
The Surface Determination tool determines the surface between the material and the background of the active volume and stores it in a mask. The mask carries the surface with sub-voxel accuracy: every later step that reads a mask surface, such as Convert to Surface, Deviation and Wall Thickness, uses that surface unchanged.
The tool offers four ways to place the surface: a manual isovalue, the ISO50 level between the background and material gray values, one of twelve histogram threshold methods, and an advanced local refinement for dimensional measurement on reconstructed CT volumes.
Accessing the Tool
- Navigate to the Segmentation tab in the ribbon.
- Click Surface Determination in the Create Mask section.
Parameters
The panel shows only the controls the selected method reads. A control the method does not use is removed rather than grayed, so what remains is what takes part in the result. A value the tool works out for itself stays visible and becomes read-only, so it reads as a result rather than as a field that refuses input.
Material definition

- Method: How the surface is placed.
- Manual: One isovalue that you type or drag on the histogram. Voxels at or above it are material.
- ISO50: The level halfway between the background and the material gray values. This is the conventional global surface for a homogeneous material against air.
- Histogram method: A threshold from a histogram calculator (Huang, Intermodes, IsoData, Kittler-Illingworth, Li, Maximum Entropy, Moments, Otsu, Renyi Entropy, Shanbhag, Triangle, Yen). These are segmentation methods; they do not aim at the physical interface.
- Advanced (local adaptive): Starts from a global surface and moves every surface point along the local surface normal to the position of the strongest gray value change, within a search distance. Use it for dimensional measurement when beam hardening, scatter or a wrong global level shift the surface.
- Starting method: The global surface the advanced refinement starts from: ISO50, Manual or Histogram method. Shown for the advanced method only.
- Histogram method: Which calculator supplies the threshold. Shown for the Histogram method, and for the advanced method when it starts from one.
- Isovalue: The gray value of the surface. You set it under Manual, and under Advanced started from Manual. Under the other methods it shows the resolved value and cannot be typed.
When the tool binds to a volume it reads the gray value distribution once and fills in the background, the material and the isovalue from it. These three describe the volume rather than the tool, so they are taken from the active volume each time instead of being restored from the previous session. The Manual method therefore opens at the ISO50 level of the volume rather than at an arbitrary value.
This isovalue is a measurement parameter. It is independent of the isosurface value in Render Properties, which only controls what the 3D view draws. Adjusting the view never changes a surface you have determined, and determining a surface never changes the view. Both start from the same estimate of the volume, so they agree until one of them is deliberately moved.
Gray values
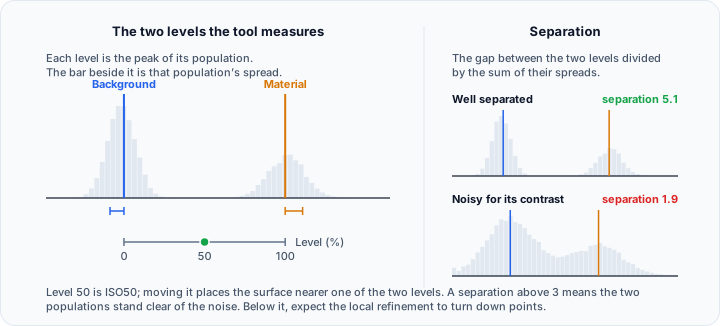
Shown for ISO50 and for the advanced method, which are the methods that read the two levels.
- Estimate from the histogram: When checked, the background and the material are the two peaks of the volume histogram, and both fields are recomputed on every change. Clear the checkbox to type them; a zero or negative background is a valid level.
- Background, Material: The two gray values. They are read-only while the estimate is on.
- Estimate: Fills both fields from the histogram once. It is available only while the estimate is off, because with the estimate on every change already refreshes them. This is the way back to measured levels after you have typed or dragged your own.
- From profile line: Takes the lowest and the highest gray value of a drawn profile line. Noise, pores and ringing affect these extrema. The button becomes available once a profile line exists.
- Level (%): Where the surface lies between the background at 0 and the material at 100. 50 is ISO50. The accepted range is 0.1 to 99.9.
- Separation: The distance between the two gray value peaks divided by the sum of their spreads. A low value means the volume is noisy relative to its contrast, and the local refinement may reject many points.
Dragging the background or the material line on the histogram, and pressing From profile line, both switch the automatic estimate off, because each is a manual choice of the two levels.
Local refinement
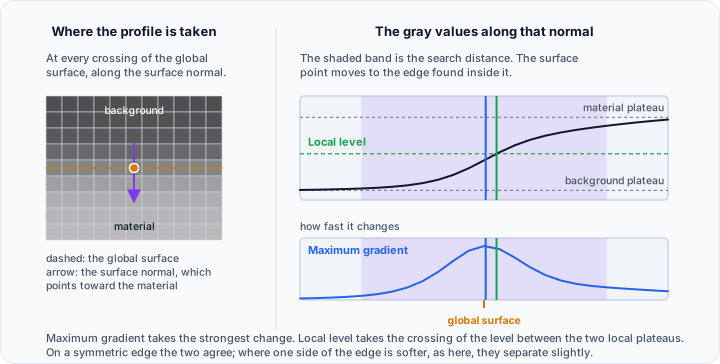
Shown for the advanced method only.
- Edge criterion:
- Maximum gradient: The position of the strongest gray value change along the normal.
- Local level: The position where the gray values cross the level between the two local plateaus on either side of the edge.
- Automatic search distance: When checked, the search distance is derived from the measured width of the edges in the volume, and the field below it is filled in and made read-only. The line underneath reports the distance in voxel units, the same distance in physical units, and the voxel unit itself. Measuring the width reads the whole volume, so while you drag a line on the histogram the tool keeps the distance it measured last and updates it once you release the button. On a large reconstruction this is what keeps the drag responsive.
- Search distance (voxels): How far along the normal the refinement looks for the edge, in multiples of the smallest voxel spacing. The accepted range is 1.5 to 6. Keep it below half the thickness of the thinnest wall you need; a larger distance can reach the opposite face.
- Profile smoothing (voxels): Gaussian smoothing of the gray values along the normal before the edge is located. 0 uses the profile as it is. The accepted range is 0 to 5.
Messages
A line below the groups reports why an estimate is unavailable, possible clipping of the gray values at the ends of the reconstruction range, low separation between the two populations, and, after Apply, how many edge points the refinement accepted. It appears under every method and stays empty while there is nothing to report.
Histogram
The gray value distribution of the volume, drawn in the Interactive Histogram Chart.
One line marks the isovalue. You can drag it under Manual, and under Advanced started from Manual; under the other methods it follows the resolved isovalue. For ISO50 and the advanced method, two further lines mark the background and the material, and both can be dragged. A tooltip beside the cursor names the value while a line is being dragged, because the axis is too coarse to read it off and the fields only catch up when the drag ends.
Profile line
Draw a line on a slice view to see the gray value profile along it. Under Manual the midpoint of the profile range becomes the isovalue. Under ISO50 and the advanced method, use From profile line to take the profile extrema as the background and the material. The group is hidden for the Histogram method, which reads neither.
3D preview
The preview is off when the tool opens and computes nothing until you switch it on. Its checkbox both turns it on and opens the group, so the settings of a preview that is off take no room in the panel.
-
Mode:
- Mesh overlay: Samples the volume within a fixed budget, contours the sample with the current method and overlays the mesh on the 3D view. It works for every method, including the advanced one. It follows the settings, so changing the method, the isovalue or the gray values rebuilds it. The overlay is approximate: thin structures can disappear at the sampled resolution, and it is never saved or measured.
- Volume iso-surface: Switches the volume rendering of the active volume to its iso-surface mode at the isovalue. It follows the isovalue live and needs GPU rendering. The volume is shown if it was hidden, the other volumes in the scene keep the rendering they had, and the original rendering is restored when the preview ends. It shows the gray value iso-surface, which can differ from the mask contour.
The advanced method produces no gray value iso-surface, so Mode is hidden there and the mesh overlay is the only way to preview.
-
Resolution: How many voxels the sampled copy may use. A higher resolution keeps finer detail and costs more memory and time. Shown for the mesh overlay only.
A status line below reports the triangle count and the sampling factors of a finished mesh, or the reason a preview could not be produced.
The preview is released when you switch it off, when the tool closes and when you press Apply, and the checkbox clears with it, so it never claims to show something that is gone. After Apply, the resulting mask carries a 3D preview of its own. Closing the previewed volume also releases it, but leaves the preview switched on, so it returns for the next volume you activate.
Result
- Target Mask: Create a new mask object, or select an existing mask to receive the result. An existing mask must use the same voxel grid as the active volume. Its contents are replaced; there is no merge. Multi-label masks are not offered.
Cavity filling, region filtering and merging are not part of this tool. Apply them afterwards with the mask tools; note that they change the determined surface.
Workflow
- Activate the volume. The tool reads its gray value distribution and fills in the background, the material and the isovalue.
- Choose the Method. For a homogeneous part in air, ISO50 is the usual starting point. For dimensional measurement, choose Advanced (local adaptive) with ISO50 as the starting method.
- Check the two gray values. Read Separation. Above 3 the two populations are well apart from the noise; below it, expect the local refinement to reject points. If the estimate has picked the wrong peaks, clear Estimate from the histogram and type the levels, drag them on the histogram, or take them from a profile line.
- Check the slice views. The green fill shows the material and the amber line shows the determined surface on the current slices. Move through the slices and check thin walls and internal features. The preview is computed for the slices you are looking at, not for the whole volume.
- Read the message line. Clipped gray values, low separation and an unresolved estimate are reported there. Apply stays disabled while the settings cannot be resolved.
- Optionally switch on the 3D preview to judge the surface as a whole before committing to it.
- Choose the Target Mask and press Apply. The message line then reports how many edge points the refinement accepted.
How It Works
The global methods classify every voxel against one isovalue. The advanced method looks at the gray values along the surface normal at every point where the global surface crosses the voxel grid, finds the edge according to the chosen criterion, and rejects points whose profile shows too little contrast, more than one candidate edge, an edge outside the search distance, or gray values that are still sloping at both ends of the window. Rejected points keep the global surface, so the result degrades to the global surface locally instead of leaving holes. Points near an opposite face are limited to half the distance to that face.

The mask stores the surface as partial gray values around it: voxels at 128 and above are material, voxels below 128 are background, and the values in between place the surface at 127.5 with a resolution well below one voxel. How far below depends on the shape of the voxels: cubic voxels resolve the surface to about a hundredth of the spacing, while strongly elongated voxels reach about a tenth of the smallest spacing. Everything farther than one and a half voxels from the surface is 0 or 255.

Sub-voxel coordinates are not the same as sub-voxel accuracy. The surface is only as good as the isovalue and the local edge positions. Validate the tool on calibrated artefacts before relying on it for dimensional measurement.
Scripting
import ScriptingApi as api

app = api.Application()
mask_operations = app.get_mask_operations()

params = api.SurfaceDeterminationParams()
params.method = api.SurfaceDeterminationMethod.Advanced
params.starting_method = api.SurfaceDeterminationStartingMethod.Iso50
params.edge_criterion = api.SurfaceEdgeCriterion.MaximumGradient
params.automatic_search_distance = True

estimate = mask_operations.estimate_surface_determination('CT_Volume', params)
if estimate.valid:
    print(f"isovalue {estimate.iso_value:.1f}, search distance {estimate.search_distance_voxels:.2f} voxels")
    mask_name = mask_operations.surface_determination('CT_Volume', params)
else:
    print(estimate.message)
surface_determination returns the name of the created or replaced mask, an empty string when no surface crosses the volume or the run was cancelled, and raises an error for invalid settings and resource limits. estimate_surface_determination resolves the settings without creating anything, which makes it the way to check a volume before committing a batch to it.
See the MaskOperations API Reference for details.
Use Cases
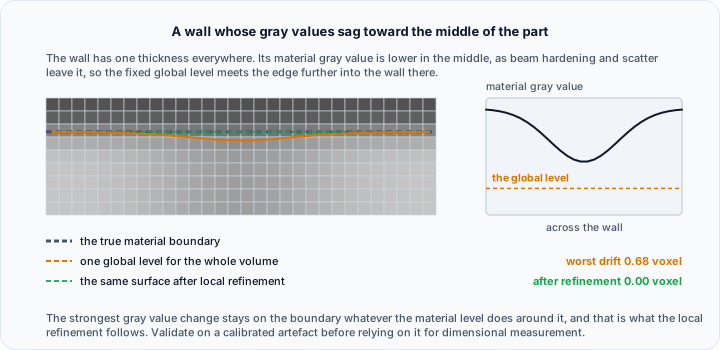
- Dimensional measurement of a reconstructed CT volume. Use the advanced method started from ISO50 with the automatic search distance, then pass the mask to Convert to Surface, Deviation or Wall Thickness. The local refinement corrects the surface where beam hardening or scatter has shifted it, which a single global level cannot do.
- A defensible global surface. Use ISO50 with the estimate from the histogram when the part is homogeneous and surrounded by air. The level follows from the two measured gray value populations rather than from a visual adjustment, and the separation figure records how well the data supported it.
- A surface between two materials. Use ISO50 and move Level (%) away from 50 to place the boundary nearer one of the two populations, for example when the materials differ in density and the halfway level does not sit on the interface.
- Segmentation rather than metrology. Use a histogram method when the aim is to separate populations for further processing rather than to locate a physical interface. These calculators optimise a statistical criterion and make no claim about the surface position.
- Difficult or unusual data. Use Manual with the histogram line, or with a profile line drawn across the feature, when the distribution has no clear two-peak shape and the automatic estimate cannot be trusted.
Relationship to Other Threshold Tools
| Tool | Description | Bounds |
|---|---|---|
| Surface Determination | Manual, ISO50, histogram method or advanced local refinement, with a sub-voxel mask surface | One isovalue |
| Threshold | Range thresholding | Lower and upper bounds |
| Multilevel Thresholding | Automatic multi-threshold using Otsu or K-means | Multiple thresholds (N thresholds for N+1 regions) |
Use Surface Determination when one surface separates the material from the background. Use Threshold when both ends of the included range must be controlled.
Tips
- Separation: A value above 3 means the two gray value populations are well apart from the noise. Below that, expect rejected points in the advanced method.
- Search distance: Start with the automatic distance and reduce it for thin walls.
- Clipping: When the tool reports clipped gray values, the reconstruction range cuts into a population and the estimated level may be biased.
- Replacing a mask: Replacing keeps the mask object, its colour and its position in the scene tree.
- Undo: Apply is one undo step, for a new and for a replaced mask.
See Also
- Threshold: range-based thresholding.
- Multilevel Thresholding: automatic multi-threshold segmentation.
- Segmentation Tab Overview: overview of all segmentation tools.