Favorite Tab Overview
The Favorite tab provides a fully customizable workspace where you can organize your most frequently used tools for quick access. Rather than navigating through multiple ribbon tabs to find commonly used functions, you can consolidate them into a single location tailored to your specific workflow.
Beyond simple tool aggregation, the Favorite tab system supports:
- Multiple custom tabs for organizing tools by project type or workflow stage
- Workspace profiles for saving and switching between different configurations
- Custom Python script buttons for automating repetitive tasks
- Tab visibility control for hiding unused default tabs
The Favorite Tab Concept
Every user has a unique set of tools they use most often. A researcher performing segmentation may constantly switch between thresholding, region growing, and morphological operations. A quality control engineer might primarily use deviation analysis and measurement tools. The Favorite tab allows each user to create a personalized toolbar containing exactly the tools they need.
The system works by referencing buttons and actions from other ribbon tabs. When you add a tool to your Favorite tab, it creates a shortcut—the original tool remains in its default location while also appearing in your customized workspace.
Accessing the Customize Dialog
To customize your workspace, click the Create Profile button in the Favorite ribbon tab. This opens the Customize Workspace Tabs dialog, which provides comprehensive control over your workspace configuration.
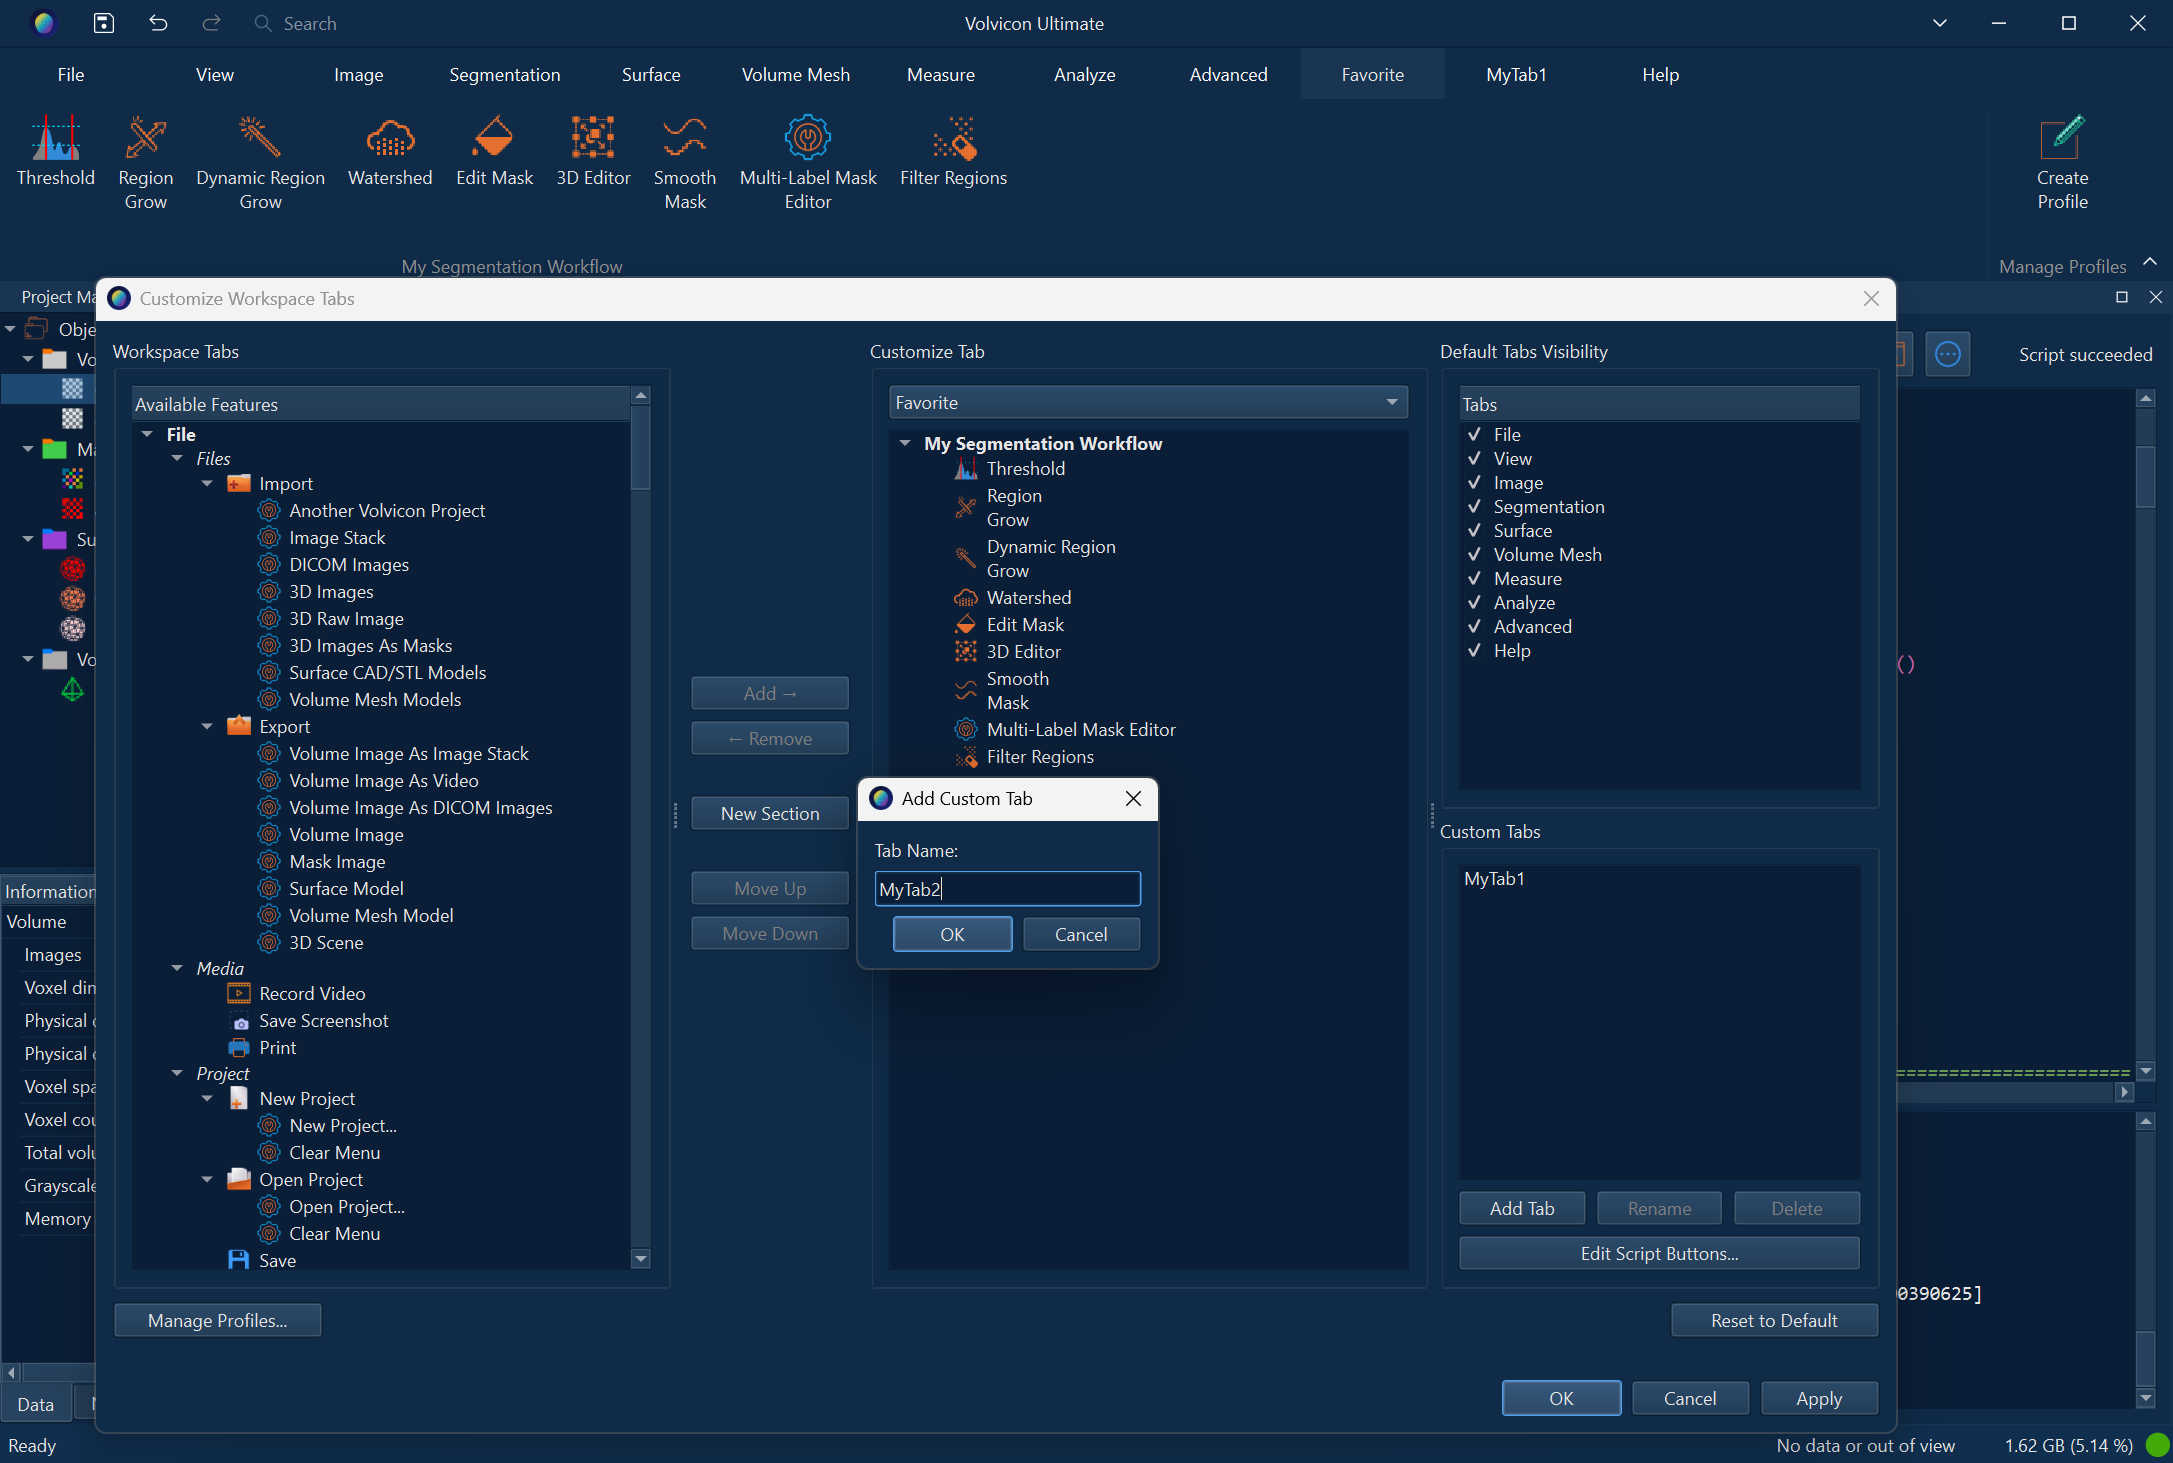
Customize Workspace Tabs Dialog
The Customize Workspace Tabs dialog is divided into four main areas:
Workspace Tabs (Left Panel)
This panel displays all available features organized hierarchically:
| Level | Description |
|---|---|
| Tab | Top-level grouping (e.g., File, Image, Segment, Surface) |
| Section | Functional grouping within each tab (e.g., Edit, Convert, Tools) |
| Button | Individual tool buttons that can be added to favorites |
| Action | Menu actions from dropdown buttons (expandable under their parent button) |
Additionally, an Application Actions category contains standalone menu actions not associated with specific toolbar buttons.
Control Buttons (Center)
| Button | Function |
|---|---|
| Add → | Add selected items from the left panel to the current custom or Favorite tab |
| ← Remove | Remove selected items from the Favorite/custom tab |
| New Section | Create a new section to organize tools within the current tab |
| Move Up | Move the selected item up within its section |
| Move Down | Move the selected item down within its section |
Customize Tab (Right Panel)
This panel shows the contents of your Favorite or custom tab:
| Element | Description |
|---|---|
| Target Tab Dropdown | Select which tab to customize (Favorite or any custom tab you've created) |
| Sections | Bold text items representing organizational groups within the tab |
| Tools | Individual buttons and actions organized under sections |
Sections can be renamed by double-clicking on them. Tools can be reordered using the Move Up/Move Down buttons.
Tab Management (Far Right Panel)
This panel provides control over tab visibility and custom tab creation:
Default Tabs Visibility
A checklist of all standard Volvicon tabs. Uncheck a tab to hide it from the ribbon interface. This is useful for:
- Simplifying the interface for specialized workflows
- Reducing visual clutter when certain features aren't needed
- Creating role-specific configurations (e.g., hiding advanced features for training purposes)
Custom Tabs
Create additional tabs beyond the built-in Favorite tab:
| Button | Function |
|---|---|
| Add Tab | Create a new custom tab with a specified name |
| Rename | Change the name of the selected custom tab |
| Delete | Remove the selected custom tab and all its contents |
You can create up to 50 custom tabs in addition to the default Favorite tab.
Edit Script Buttons
Opens the Manage Script Buttons dialog for creating custom Python automation buttons. See Custom Script Buttons below.
Custom script buttons require Custom Scripting, which is available on Professional and above licenses.
Working with Sections
Sections help organize tools within your Favorite or custom tabs. Each section appears as a visually distinct group in the ribbon interface.
Creating Sections
- In the Customize Workspace Tabs dialog, select the target tab from the dropdown
- Click New Section
- Enter a descriptive name for the section
- The new section appears in the tree view, ready to receive tools
Organizing Tools into Sections
- Select one or more sections or tools in the right panel
- In the left panel, navigate to the desired tool
- Click Add → to add the tool to the selected section
- If no section is selected, the tool is added to the first available section
Renaming Sections
Double-click any section name in the right panel to edit it directly.
Removing Sections
Select a section and click ← Remove. This removes the section and all tools within it from the Favorite/custom tab.
Workspace Profiles
Profiles save your entire workspace configuration, including:
- All Favorite tab contents and organization
- Custom tab definitions and their contents
- Tab visibility settings
- Custom script button configurations
Managing Profiles
Click Manage Profiles... at the bottom of the Customize Workspace Tabs dialog to open the Workspace Profile Manager:
| Column | Description |
|---|---|
| Profile Name | The saved name of the profile |
| Last Modified | When the profile was last saved |
| File Path | Location of the profile file on disk |
Profile Operations
| Button | Function |
|---|---|
| Create From Current... | Save the current workspace configuration as a new named profile |
| Delete Selected | Remove the highlighted profile from the system |
| Delete All | Remove all saved profiles |
| Import From File... | Load a profile from a .json file (useful for sharing configurations) |
| OK | Load the selected profile and apply it to the workspace |
Profile Use Cases
- Role-based configurations: Create profiles for different user roles (e.g., "Segmentation Specialist", "QC Inspector")
- Project-specific setups: Different projects may require different tool combinations
- Training environments: Simplified profiles for new users learning the software
- Shared team workflows: Export and share profiles across team members
Resetting to Default
Click Reset to Default to clear all customizations and restore the original Favorite tab state. This removes:
- All added tools from the Favorite tab
- All custom tabs
- All tab visibility changes
- All script buttons
A confirmation dialog appears before the reset is applied.
Custom Script Buttons
For users with scripting-enabled licenses, the Favorite tab system supports creating custom buttons that execute Python scripts. This enables powerful workflow automation directly from the ribbon interface.
Accessing Script Button Management
- Open the Customize Workspace Tabs dialog
- Ensure at least one custom tab exists (script buttons can only be added to custom tabs)
- Click Edit Script Buttons...
Creating a Script Button
In the Manage Script Buttons dialog, click Add... to open the script button editor:
| Field | Description |
|---|---|
| Target Tab | Select which custom tab will contain this button |
| Section | Specify the section name within the target tab |
| Button Name | The display text for the button |
| Tooltip | Help text shown when hovering over the button |
| Script Path | Full path to the Python script file (.py) |
| Icon Path | Optional path to an icon image for the button |
Managing Existing Script Buttons
The Manage Script Buttons dialog displays all configured script buttons in a table:
| Button | Function |
|---|---|
| Add... | Create a new script button |
| Edit... | Modify the selected script button |
| Remove | Delete the selected script button |
| Move Up | Change button order within its section |
| Move Down | Change button order within its section |
Script Button Requirements
- Script buttons can only be placed in custom tabs, not the default Favorite tab
- The Python script must be accessible at the specified path
- Scripts execute in Volvicon's Python environment with access to the full API
For script development and testing, use the Scripting panel in the Advanced tab before creating a permanent button.
Applying Changes
The Customize Workspace Tabs dialog provides three ways to finalize your changes:
| Button | Behavior |
|---|---|
| Apply | Save changes and keep the dialog open for further modifications |
| OK | Save changes, update the ribbon, and close the dialog |
| Cancel | Discard all changes and close the dialog |
When you click Apply or OK, the system:
- Updates the Favorite tab and any custom tabs with your configuration
- Applies tab visibility settings (hiding/showing tabs)
- Saves the configuration as the current profile for automatic loading on next startup
Best Practices
Organizing Your Workspace
- Group related tools: Create sections like "Segmentation Tools", "Measurement", or "Export Options"
- Limit section size: Keep sections focused with 3-7 tools each for easy scanning
- Use descriptive section names: Clear names help you find tools quickly
Profile Strategy
- Start with defaults: Work with Volvicon for a while before customizing to understand which tools you use most
- Create backup profiles: Before major changes, save your current configuration
- Share profiles carefully: Ensure script paths and dependencies exist on target machines
Performance Considerations
- Adding many tools to the Favorite tab doesn't impact application performance
- Custom tabs are loaded on application startup, so excessive customization has minimal runtime cost
- Profile files are small JSON documents and load quickly
Troubleshooting
Tools Not Appearing in Favorite Tab
- Ensure you clicked Apply or OK after making changes
- Verify the tool was added to a section, not left orphaned
- Check that the source tool's license requirements are met
Custom Tab Not Visible
- Custom tabs appear in the ribbon only after applying changes
- Verify the custom tab contains at least one tool
- Check that the tab wasn't inadvertently deleted
Script Button Not Working
- Verify the script path is correct and the file exists
- Check that your license includes the Scripting module
- Test the script in the Scripting panel first to ensure it runs correctly
Profile Won't Load
- Ensure the profile file exists at the specified path
- Check that the
.jsonfile isn't corrupted - Verify file permissions allow reading the profile
Related Topics
- Advanced Tab Overview - Access the Python scripting environment
- License Guide - Information about license types and features