Editor
The Editor tool provides interactive editing capabilities for manual manipulation of surface meshes at the triangle level. This tool is essential for fine-grained corrections that automated tools cannot handle, such as removing specific triangles, adding missing faces, or adjusting vertex positions.
This tool is provided for research and educational purposes only. Any clinical or diagnostic use requires proper validation in accordance with applicable regulations.
Overview
While automated tools handle most mesh repair tasks, some situations require manual intervention:
- Removing specific problematic triangles that automated detection misses
- Adding triangles to bridge gaps or close complex holes
- Fine-tuning vertex positions for better surface quality
- Creating custom surface modifications for specific applications
The Editor tool provides three editing modes, each designed for a specific type of mesh manipulation.
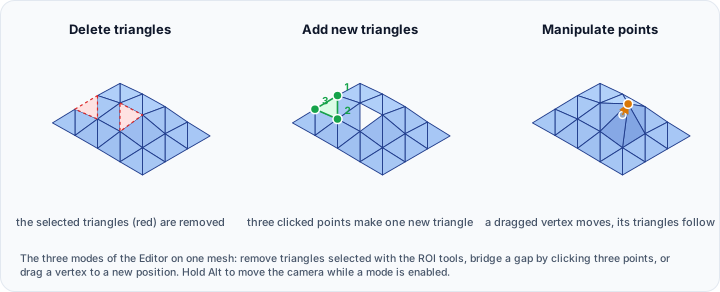
Editing Modes
Delete Triangles Mode
The Delete triangles mode allows you to select and remove triangles from visible surfaces using various region-of-interest (ROI) selection tools.
ROI Selection Tools
Multiple selection tools are available for selecting triangles:
The ROI selection tools group offers:
| Tool | Description |
|---|---|
| Rectangle | Left-click and drag to draw a rectangular selection region |
| Polygon | Left-click to place vertices, middle-click to close the polygon |
| Sphere | Select triangles within a spherical region |
| Plane | Select triangles against a plane |
| Cylinder | Select triangles within a cylindrical region |
| Lasso | Left-click and drag to draw a freehand outline |
| Brush | Paint over triangles, with a Brush size (mm) setting |
Selection Options
The Selection options group controls how each new ROI combines with what is already selected:
| Option | Description |
|---|---|
| Add selection | Include newly selected surface regions in the selection |
| Subtract selection | Remove newly selected surface regions from the selection |
| Toggle Selection | Invert the selection state of the newly selected regions |
| Clear Selection | Discard the current selection |
| Toggle Selection Visibility | Show or hide the selection highlight |
| Two sided selection | Also select triangles facing away from the camera |
| Brush size (mm) | Radius of the Brush ROI |
Delete on the Fly
When the Delete on the fly option is enabled:
- Selected triangles are immediately deleted as you complete each selection
- No need to click Apply after each selection
- Faster workflow for removing multiple regions
When disabled, selections accumulate until you click Apply.
Operations
After selecting triangles (when Delete on the fly is disabled):
| Operation | Description |
|---|---|
| Delete selection | Remove the selected triangles from the surface(s) |
| Retain selection | Delete unselected triangles and create a new surface from the selection |
Add New Triangles Mode
The Add new triangles mode allows you to create new triangles by selecting three points on the active surface.
Workflow
- Select Add new triangles mode
- Click Enable to activate the interactive mode
- Left-click to select three points on the surface
- A new triangle is created connecting those three points
- Continue adding triangles or click Enable again to deactivate
Hold the Alt key while in this mode to enable camera spinning, panning, and zooming without accidentally placing points.
Use Cases
- Bridging gaps between surface regions
- Closing small holes manually
- Adding missing faces to incomplete meshes
- Creating custom surface connections
Manipulate Points Mode
The Manipulate points mode allows you to move individual vertices to adjust surface geometry.
Workflow
- Select Manipulate points mode
- Click Enable to activate the interactive mode
- Left-click and drag on a vertex to move it
- The vertex follows your mouse movement
- Release to place the vertex
- Continue adjusting vertices or click Enable again to deactivate
Hold the Alt key while in this mode to enable camera spinning, panning, and zooming without accidentally moving vertices.
Use Cases
- Smoothing local surface irregularities
- Adjusting vertex positions for better triangle quality
- Fine-tuning surface shape in specific areas
- Correcting small geometric errors
Interface
Mode Selection
| Mode | Description |
|---|---|
| Delete triangles | Select and remove triangles using ROI tools |
| Add new triangles | Click three points to create new triangles |
| Manipulate points | Drag vertices to new positions |
Delete Triangles Mode Controls
When in Delete triangles mode, the full ROI selection toolkit is available:
- Selection tool buttons (freehand, rectangle, polygon, etc.)
- Selection mode toggle (add/replace)
- Target surface selector
- Delete on the fly checkbox
Add/Manipulate Mode Controls
When in Add new triangles or Manipulate points mode:
| Control | Description |
|---|---|
| Enable button | Activates/deactivates the interactive editing mode |
Operations (Delete Mode)
| Option | Description | Default |
|---|---|---|
| Delete selection | Remove selected triangles | Selected |
| Retain selection | Create new surface from selection |
Actions
| Button | Description |
|---|---|
| Apply | Execute the selected operation (Delete mode only) |
Typical Workflows
Removing Specific Triangles
To remove problematic triangles that weren't caught by automated tools:
- Select Delete triangles mode
- Choose an appropriate ROI selection tool
- Enable Delete on the fly for quick removal
- Click and drag to select triangles to remove
- Repeat until all unwanted triangles are removed
Bridging a Gap
To connect two separate surface regions:
- Select Add new triangles mode
- Click Enable to activate
- Carefully click three points to create each bridging triangle
- Build up triangles to close the gap
- Hold Alt to rotate view as needed
- Click Enable to deactivate when done
Extracting a Region
To cut out a region as a new surface:
- Select Delete triangles mode
- Disable Delete on the fly
- Select the region you want to extract
- Choose Retain selection
- Click Apply
The selected region becomes a new surface object.
Smoothing Vertex Positions
To manually smooth a bumpy area:
- Select Manipulate points mode
- Click Enable to activate
- Drag vertices to more appropriate positions
- Hold Alt to adjust your view
- Continue until the surface is smooth
- Click Enable to deactivate
Best Practices
-
Save before editing: Manual editing is hard to undo. Save your work or duplicate the surface before extensive editing.
-
Use appropriate zoom: Zoom in close to the area you're editing for precise control.
-
Work incrementally: Make small changes and verify results frequently.
-
Consider automated tools first: Use Diagnostics and Fixes for bulk operations; reserve manual editing for cases they can't handle.
-
Maintain mesh quality: When adding triangles, try to create triangles with reasonable aspect ratios (not too elongated or thin).
-
Fill holes after deleting: Deleting triangles creates holes. Use Fill Holes or manually add triangles to close them.
-
Use Alt key liberally: The Alt key is your friend—it lets you navigate without accidentally editing.
Keyboard Shortcuts
| Key | Action |
|---|---|
| Alt (hold) | Enable camera navigation (spin, pan, zoom) |
| Delete | Delete selected triangles (when enabled in Delete mode) |
| Escape | Cancel current selection or operation |
See Also
- Diagnostics and Fixes - Automated mesh repair tools
- Fill Holes - Close holes created by triangle deletion
- Smooth - Automated surface smoothing
- Remesh - Improve overall mesh quality