Crop
The Crop tool removes voxels outside a defined bounding box, reducing the image extent and file size. Use cropping to focus on a region of interest and eliminate empty or irrelevant regions.
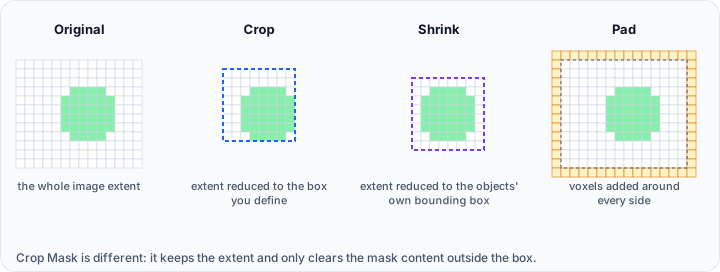
Accessing the Tool
- Navigate to the Image tab in the ribbon.
- Click Crop in the Transform section.
Cropping Interface
When the Crop tool is activated, an interactive bounding box appears in the 3D and 2D views.
Options
| Option | Description |
|---|---|
| Enable cropping | Toggle real-time preview of the cropped region |
| Show box | Display or hide the bounding box wireframe |
Bounds
Define the crop region using pixel ranges for each axis:
| Parameter | Description |
|---|---|
| Min X - Max X (pixel) | Extent kept along X, in voxels |
| Min Y - Max Y (pixel) | Extent kept along Y, in voxels |
| Min Z - Max Z (pixel) | Extent kept along Z, in voxels |
Each row is a double-ended slider with a number box at either end. Type a value and press Enter, or drag the handles. Reset returns all three ranges to the full extent of the data.
Use the sliders or enter values directly to adjust each range.
Interactive Adjustment
- Drag box faces: Click and drag the faces of the bounding box in the 3D view to resize.
- Drag box edges: Adjust two dimensions simultaneously.
- Drag box corners: Resize all three dimensions at once.
Information Panel
The tool displays dimensional information to help you understand the cropping effect:
| Field | Description |
|---|---|
| Input physical dimensions (mm) | Volume size before cropping |
| Output physical dimensions (mm) | Volume size the current bounds would produce |
| Input voxel dimensions (pixels) | Voxel counts before cropping |
| Output voxel dimensions (pixels) | Voxel counts the current bounds would produce |
The output rows follow the bounds as you drag them, so the result of a crop is visible before it is applied.
Workflow
- Open the Crop tool from the Image tab.
- Enable Show box to visualize the crop region.
- Adjust the Min/Max sliders for X, Y, and Z to define the region of interest.
- Review the Information panel to verify the output dimensions.
- Click Reset to restore the original bounds if needed.
- Click Apply to perform the crop operation.
Cropping is a destructive operation that permanently removes voxel data outside the crop region. Save your project before cropping if you need to preserve the original data.
Affected Objects
Cropping affects:
- All volume objects in the project
- All mask objects in the project
Both volumes and masks are cropped to the same bounds to maintain spatial alignment.
Use Cases
Reducing File Size
Large datasets often contain significant empty or background regions. Crop to the region containing actual data to:
- Reduce memory usage
- Speed up processing operations
- Decrease project file size
Isolating Regions of Interest
Focus analysis on specific anatomical regions:
- Navigate to the region of interest in slice views.
- Adjust crop bounds to enclose only the target region.
- Apply the crop.
- Subsequent operations process only the relevant data.
Scripting
This operation is available via the Python scripting API using crop().
import ScriptingApi as api

app = api.Application()
volume_operations = app.get_volume_operations()

# Crop bounds: [xMin, xMax, yMin, yMax, zMin, zMax] in millimeters
volume_operations.crop(["Volume1"], [-50.0, 50.0, -50.0, 50.0, 0.0, 100.0])
See the VolumeOperations API Reference for details.
If the specified bounds extend beyond the original image extent, only the overlapping region is retained.