AI-Powered Segmentation
AI-powered segmentation leverages deep learning models to automatically identify and delineate anatomical structures. This tutorial covers installation, configuration, and usage of the four supported frameworks: TotalSegmentator, nnU-Net, MONAI, and Cellpose-SAM.
Estimated time: 40 minutes
Prerequisites:
- Volvicon installed with valid license
- Administrative privileges for framework installation
- Stable internet connection
- GPU recommended (NVIDIA CUDA) but CPU supported
AI segmentation tools are intended for research purposes only and are not approved for clinical or diagnostic use by any regulatory body. Results should always be reviewed and validated by qualified professionals.
Understanding AI Segmentation
How It Works
Deep learning segmentation models:
- Process the input image through neural network layers
- Classify each voxel into anatomical categories
- Output segmentation masks for identified structures
These models are trained on large annotated datasets, learning to recognize patterns that distinguish different tissues and organs.
Available Frameworks
| Framework | Specialty | Structures | Modality |
|---|---|---|---|
| TotalSegmentator | Whole-body CT | 117 structures | CT |
| nnU-Net | Self-configuring | Depends on model | Various |
| MONAI | Medical AI platform | Depends on model | Various |
| Cellpose-SAM | Instance segmentation | Per-object instances | Any (microscopy, CT, MRI) |
Installing AI Frameworks
Method 1: Application-Based Installation (Recommended)
-
Launch Volvicon as Administrator:
- Right-click the Volvicon shortcut
- Select Run as administrator
-
Access AI Segmentation:
- Navigate to Advanced → AI → AI Segmentation
-
Select the framework you want to install.
-
Click Install:
- The application downloads and configures dependencies
- Installation progress is displayed
- Wait for completion (10-30 minutes depending on connection)
-
Restart Volvicon when prompted.
Method 2: Manual Installation
If application-based installation fails:
-
Navigate to the scripts directory:
<Volvicon Installation>\scripts\python\ -
Run the installation batch file as Administrator:
totalsegmentator_venv_windows_setup.batnnunet_venv_windows_setup.batmonai_venv_windows_setup.batcellpose_venv_windows_setup.bat
-
Wait for completion without closing the command window.
-
Restart Volvicon.
Troubleshooting Installation
| Issue | Solution |
|---|---|
| Installation fails | Delete virtual environment folder and retry |
| Permission errors | Ensure running as Administrator |
| Network errors | Check firewall, verify internet connection |
| Corrupted environment | Remove <Volvicon Installation Directory>\ai\frameworks\venvs\<framework>-env (e.g., cellpose-env) and reinstall |
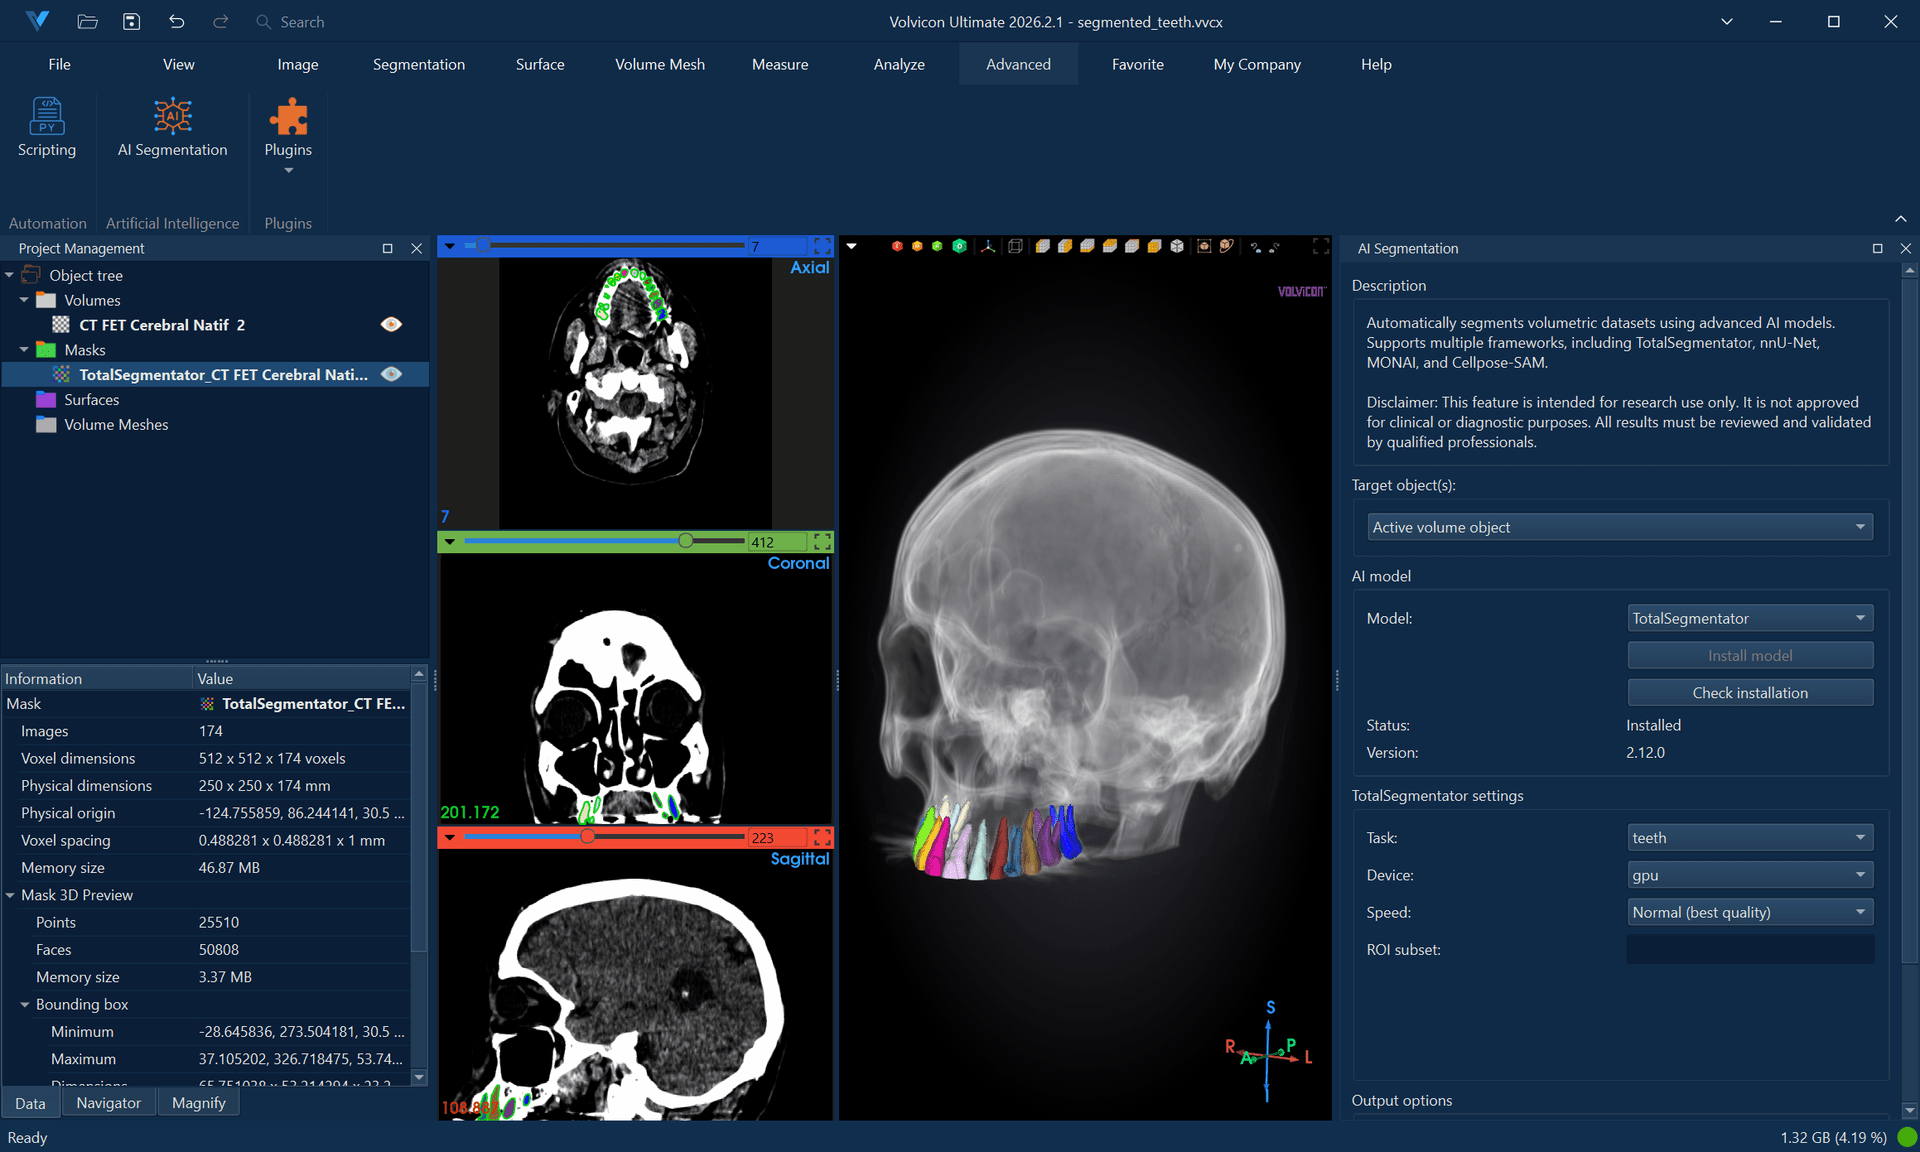
TotalSegmentator
TotalSegmentator provides automatic segmentation of 117 anatomical structures in whole-body CT scans.
Supported Structures
TotalSegmentator segments:
- Bones — Vertebrae, ribs, pelvis, skull, long bones
- Organs — Heart, lungs, liver, kidneys, spleen, pancreas
- Vessels — Aorta, vena cava, pulmonary vessels
- Muscles — Major muscle groups
- Other — Airways, fat, skin
Step-by-Step Workflow
-
Load your CT data:
- Import DICOM or NIfTI CT scan
- Ensure proper spacing and orientation
-
Open AI Segmentation:
- Navigate to Advanced → AI → AI Segmentation
-
Select TotalSegmentator from the framework dropdown.
-
Configure settings:
Setting Description Task Segmentation task (total, lung_vessels, body, etc.) Device CPU or GPU (GPU faster if available) Fast mode Quicker processing, slightly reduced accuracy -
Select the input volume.
-
Click Run Segmentation.
-
Monitor progress in the output log.
-
Review results:
- Segmentation masks are automatically imported
- Each structure appears as a separate mask
- Review in slice views and 3D
TotalSegmentator Tasks
| Task | Description |
|---|---|
| total | Complete 117-structure segmentation |
| lung_vessels | Detailed lung vessel segmentation |
| cerebral_bleed | Intracranial hemorrhage detection |
| hip_implant | Hip implant segmentation |
| coronary_arteries | Coronary artery segmentation |
| body | Body outline only |
| pleural_pericard_effusion | Effusion detection |
Full "total" segmentation takes 1-5 minutes on GPU, 10-30 minutes on CPU. Use "fast" mode for quicker results during exploration.
nnU-Net
nnU-Net (no-new-Net) is a self-configuring deep learning framework that adapts to different segmentation tasks.
Characteristics
- Self-configuring — Automatically optimizes for each task
- Flexible — Works with various imaging modalities
- Custom models — Can use pre-trained or custom models
Step-by-Step Workflow
-
Open AI Segmentation:
- Navigate to Advanced → AI → AI Segmentation
-
Select nnU-Net from the framework dropdown.
-
Configure settings:
Setting Description Trained model directory Pre-trained models directory Dataset Pre-trained model selection Configuration 2d,3d_fullres,3d_lowres,3d_lowres_high(model-dependent),3d_cascade_fullresDevice CPU or GPU npp / nps Worker-process counts for preprocessing/export ( 0/0= sequential mode) -
Select the input volume.
-
Click Run Segmentation.
-
Review results after processing completes.
Using Custom nnU-Net Models
To use models trained outside Volvicon:
- Place model files in the appropriate directory.
- Configure the model path in settings.
- Ensure model compatibility with input data format.
nnU-Net Stability Guidance (Windows)
For some models (including dental pipelines such as ToothFairy variants), inference can complete successfully while the multiprocessing export stage fails on Windows (WinError 87, SpawnPoolWorker).
npp=0andnps=0are the default values in Volvicon, which runs nnU-Net in sequential mode. If you have previously modified these settings, reset them to0/0for maximum stability on Windows.- If GPU memory is limited, nnU-Net may keep model inference on CUDA but move result arrays to CPU. This is expected behavior.
- Keep fold selection minimal (
fold 0) unless you explicitly require ensembling across folds.
Use AI Segmentation as the parameter reference, and Batch Processing and Automation when scaling the same workflow to multiple volumes.
MONAI
MONAI (Medical Open Network for AI) provides a collection of pre-trained models for various medical imaging tasks.
Available Models
MONAI supports multiple pre-trained models:
- Organ segmentation
- Tumor detection
- Anatomical landmark identification
- Custom trained models
Step-by-Step Workflow
-
Open AI Segmentation:
- Navigate to Advanced → AI → AI Segmentation
-
Select MONAI from the framework dropdown.
-
Configure settings:
Setting Description Models directory Select the pre-trained models directory Bundle Select from available pre-trained models Device CPU or GPU -
Select the input volume.
-
Click Run Segmentation.
-
Review results.
Cellpose-SAM
Cellpose-SAM is a general-purpose instance segmentation model that identifies and labels individual objects (cells, nuclei, particles) rather than tissue classes. Each detected object receives a unique integer label, making it ideal for object counting and morphometric analysis.
Characteristics
- Instance segmentation — Each detected object gets a unique label, not a class label
- Modality-agnostic — Works with microscopy, CT, MRI, and other imaging types
- 2D and 3D — Supports single-slice and volumetric segmentation
- Zero-shot — No custom model training required; uses a general pre-trained model
- Automatic download — Model weights are cached on first use (~100 MB)
Step-by-Step Workflow (3D)
-
Open AI Segmentation:
- Navigate to Advanced → AI → AI Segmentation
-
Select Cellpose-SAM from the framework dropdown.
-
Configure settings:
Setting Description Mode 3D for volumetric, 2D for single-slice Device CPU or GPU Flow Threshold Mask quality filter (default: 0.4) Cell Prob Threshold Detection sensitivity (default: 0.0) Diameter Expected object size in pixels (0 = auto) Min Size Minimum object area in pixels (default: 15) Exclude on Edges Remove objects touching image boundary Anisotropy Z-to-XY spacing ratio (3D only) Stitch Threshold Slice stitching IoU (0 = native 3D) -
Select the input volume.
-
Click Run Segmentation.
-
Review results:
- Each detected object appears with a unique label value
- Use Split Mask to separate instances into individual masks
- Generate 3D previews of individual objects
Step-by-Step Workflow (2D)
- Navigate to the slice you want to segment.
- Select Cellpose-SAM and set Mode to 2D.
- Set Slice Index to
-1(active slice) or specify a slice number. - Click Run Segmentation.
- Review results — only the selected slice contains labels.
Parameter Tuning
| Goal | Adjustment |
|---|---|
| Detect more objects | Lower Cell Prob Threshold (e.g., −2.0) |
| Reduce false positives | Raise Cell Prob Threshold (e.g., 2.0) |
| Stricter mask boundaries | Lower Flow Threshold (e.g., 0.2) |
| Accept uncertain detections | Raise Flow Threshold (e.g., 0.8) |
| Remove small fragments | Increase Min Size |
| Exclude edge objects | Enable Exclude on Edges |
| Faster 3D processing | Use Stitch Mode (Stitch Threshold ≈ 0.9) |
The first execution downloads the model automatically (~100 MB). Subsequent runs are faster since the model is cached locally in ~/.cellpose/models/.
Post-Processing AI Results
AI segmentation outputs typically require review and refinement.
Reviewing Results
-
Examine each structure:
- Scroll through slices to verify accuracy
- Generate 3D previews for spatial verification
- Compare with the original volume
-
Identify issues:
- Missing regions
- Incorrectly labeled areas
- Boundary inaccuracies
Common Refinements
| Issue | Solution |
|---|---|
| Small holes | Use Cavity Fill or Fill Holes |
| Noisy boundaries | Apply Smooth Mask |
| Missing regions | Use Edit Mask to add |
| Incorrect regions | Use Edit Mask to remove |
| Multiple labels merged | Use Split Mask or manual separation |
Combining AI with Manual Editing
Optimal workflow:
- Run AI segmentation for initial masks.
- Review results systematically.
- Apply automated refinements (smooth, fill holes).
- Manually correct remaining errors.
- Validate final segmentation.
Performance Optimization
GPU Acceleration
For faster processing:
- Ensure NVIDIA GPU with CUDA support
- Install appropriate CUDA drivers
- Select GPU in device settings
- Monitor GPU memory usage
Memory Management
| Tip | Benefit |
|---|---|
| Process cropped data | Reduces memory requirements |
| Close other applications | Frees system resources |
| Use fast mode | Reduces computational load |
| Process one dataset at a time | Prevents memory conflicts |
Batch Processing
For multiple datasets, see Batch Processing and Automation tutorial.
Practical Exercise: Whole-Body CT Segmentation
Part 1: Run TotalSegmentator
- Load a whole-body or abdominal CT scan.
- Navigate to Advanced → AI → AI Segmentation.
- Select TotalSegmentator.
- Choose total task.
- Select GPU if available, otherwise CPU.
- Enable Fast mode for initial testing.
- Click Run Segmentation.
- Wait for completion.
Part 2: Review Results
- Examine the created masks in Object Browser.
- Enable visibility for key structures (liver, kidneys, spine).
- Scroll through slice views to verify accuracy.
- Generate 3D previews for selected structures.
- Note any obvious errors.
Part 3: Refine Selected Structures
- Select a structure that needs refinement (e.g., liver).
- Apply Smooth Mask with median filter.
- Use Edit Mask to correct any significant errors.
- Apply Cavity Fill if internal voids exist.
Part 4: Generate Surfaces
- Select refined masks.
- Use Mask to Surface to generate meshes.
- Apply appropriate smoothing and decimation.
- Export surfaces if needed.
Practical Exercise: Instance Segmentation with Cellpose-SAM
Part 1: Run Cellpose-SAM
- Load a volumetric image containing distinguishable objects (e.g., cells, particles, or structures).
- Navigate to Advanced → AI → AI Segmentation.
- Select Cellpose-SAM.
- Set Mode to 3D.
- Leave Diameter at
0for automatic estimation. - Set Device to GPU if available.
- Click Run Segmentation.
- Wait for completion.
Part 2: Review Instance Labels
- Examine the output mask in slice views — each object has a unique label value.
- Use Split Mask to separate instances into individual masks.
- Count the number of detected objects.
- Scroll through slices to verify that distinct objects are correctly separated.
Part 3: Refine Detection Parameters
- If too few objects are detected, lower Cell Prob Threshold to −2.0 and re-run.
- If too many false positives appear, raise Cell Prob Threshold to 2.0.
- Enable Exclude on Edges to remove incomplete boundary objects.
- Adjust Min Size to filter out noise.
Part 4: Generate 3D Surfaces
- Select the largest instance mask.
- Generate a 3D preview.
- Convert the preview to a surface.
- Apply remeshing and surface cleanup.
- Export the surface in STL format.
Best Practices
Before Running AI Segmentation
- Verify correct image orientation
- Check that spacing metadata is accurate
- Ensure adequate image quality
- Crop to region of interest if processing time is a concern
During Processing
- Monitor progress for errors
- Don't run multiple simultaneous segmentations
- Ensure sufficient disk space for temporary files
After Processing
- Always review AI results manually
- Document any corrections made
- Validate against expert knowledge
- Consider inter-observer validation for research
For Research Use
- Document the specific model version used
- Record all processing parameters
- Maintain audit trail of modifications
- Cite appropriate references for the AI framework
Troubleshooting
Framework not available
- Verify installation completed successfully
- Restart Volvicon after installation
- Check for error messages in installation log
Segmentation fails
- Verify input data format (NIfTI for most AI tools)
- Check available memory
- Try CPU mode if GPU fails
- Review error messages in output log
Results are poor
- Verify correct modality (CT for TotalSegmentator)
- Check image quality and contrast
- Ensure proper orientation
- Try different model or task
- For Cellpose-SAM: adjust Flow Threshold and Cell Prob Threshold for sensitivity
Out of memory
- Use fast mode
- Crop input volume
- Close other applications
- Process on system with more RAM
Next Steps
With AI segmentation skills, continue to:
- Python Scripting Fundamentals — Automate AI workflows with the Scripting API
- Batch Processing and Automation — Process multiple datasets with scripted pipelines
- Command Line Interface — Launch segmentation workflows non-interactively from a terminal or automation pipeline