AI Segmentation User Guide
Disclaimer: The AI Segmentation functionality is intended for research purposes only and is not approved for clinical or diagnostic use by any regulatory body (e.g., FDA, CE). Results must always be reviewed and validated by qualified professionals.
Overview
Volvicon integrates four AI segmentation frameworks for automated image analysis:
- TotalSegmentator: Whole-body CT segmentation covering 117 anatomical structures.
- nnU-Net: Self-configuring deep learning framework for medical image segmentation.
- MONAI: Medical Open Network for AI, providing access to pre-trained models.
- Cellpose-SAM: General-purpose instance segmentation for cells, nuclei, and densely packed objects.
This guide details the installation, configuration, and execution of these frameworks within Volvicon.
Installation
Prerequisites
Before you begin, ensure you have:
- Volvicon application installed
- Administrator privileges for initial setup
- Stable internet connection for framework downloads
Installation Methods
Method 1: Application-Based Installation (Recommended)
This is the easiest and most reliable way to install AI frameworks in Volvicon.
-
Run Volvicon as Administrator
- Right-click on Volvicon executable
- Select "Run as administrator"
-
Access AI Segmentation Settings
- Navigate to the AI segmentation module
- Select the framework you want to install
- Click the "Install" button
-
Follow Installation Prompts
- The application will automatically download and configure the selected framework
- Installation progress will be displayed
- Restart Volvicon after installation completes
Method 2: Manual Batch File Installation
If application-based installation fails or for advanced users, use the manual method below:
-
Navigate to Scripts Directory
<Volvicon Installation Directory>\scripts\Python\ -
Run Installation Batch Files as Administrator
- For TotalSegmentator:
totalsegmentator_venv_windows_setup.bat - For nnU-Net:
nnunet_venv_windows_setup.bat - For MONAI:
monai_venv_windows_setup.bat - For Cellpose-SAM:
cellpose_venv_windows_setup.bat
- For TotalSegmentator:
-
Wait for Completion
- Installation may take 10-30 minutes depending on internet speed
- Do not close the command window during installation
Troubleshooting Installation
Common Issues
Installation Fails or Corrupted Environment
- Solution: Delete the virtual environment and reinstall
- Location:
<Volvicon Installation Directory>\ai\frameworks\venvs\ - Delete the specific framework folder (e.g.,
totalsegmentator-env,nnunet-env,monai-env,cellpose-env) - Run installation again as administrator
Permission Errors
- Ensure Volvicon is running as administrator
- Check that Windows User Account Control (UAC) allows the installation
Network/Download Errors
- Verify internet connection
- Check firewall settings allow Python package downloads
- Retry installation after resolving network issues
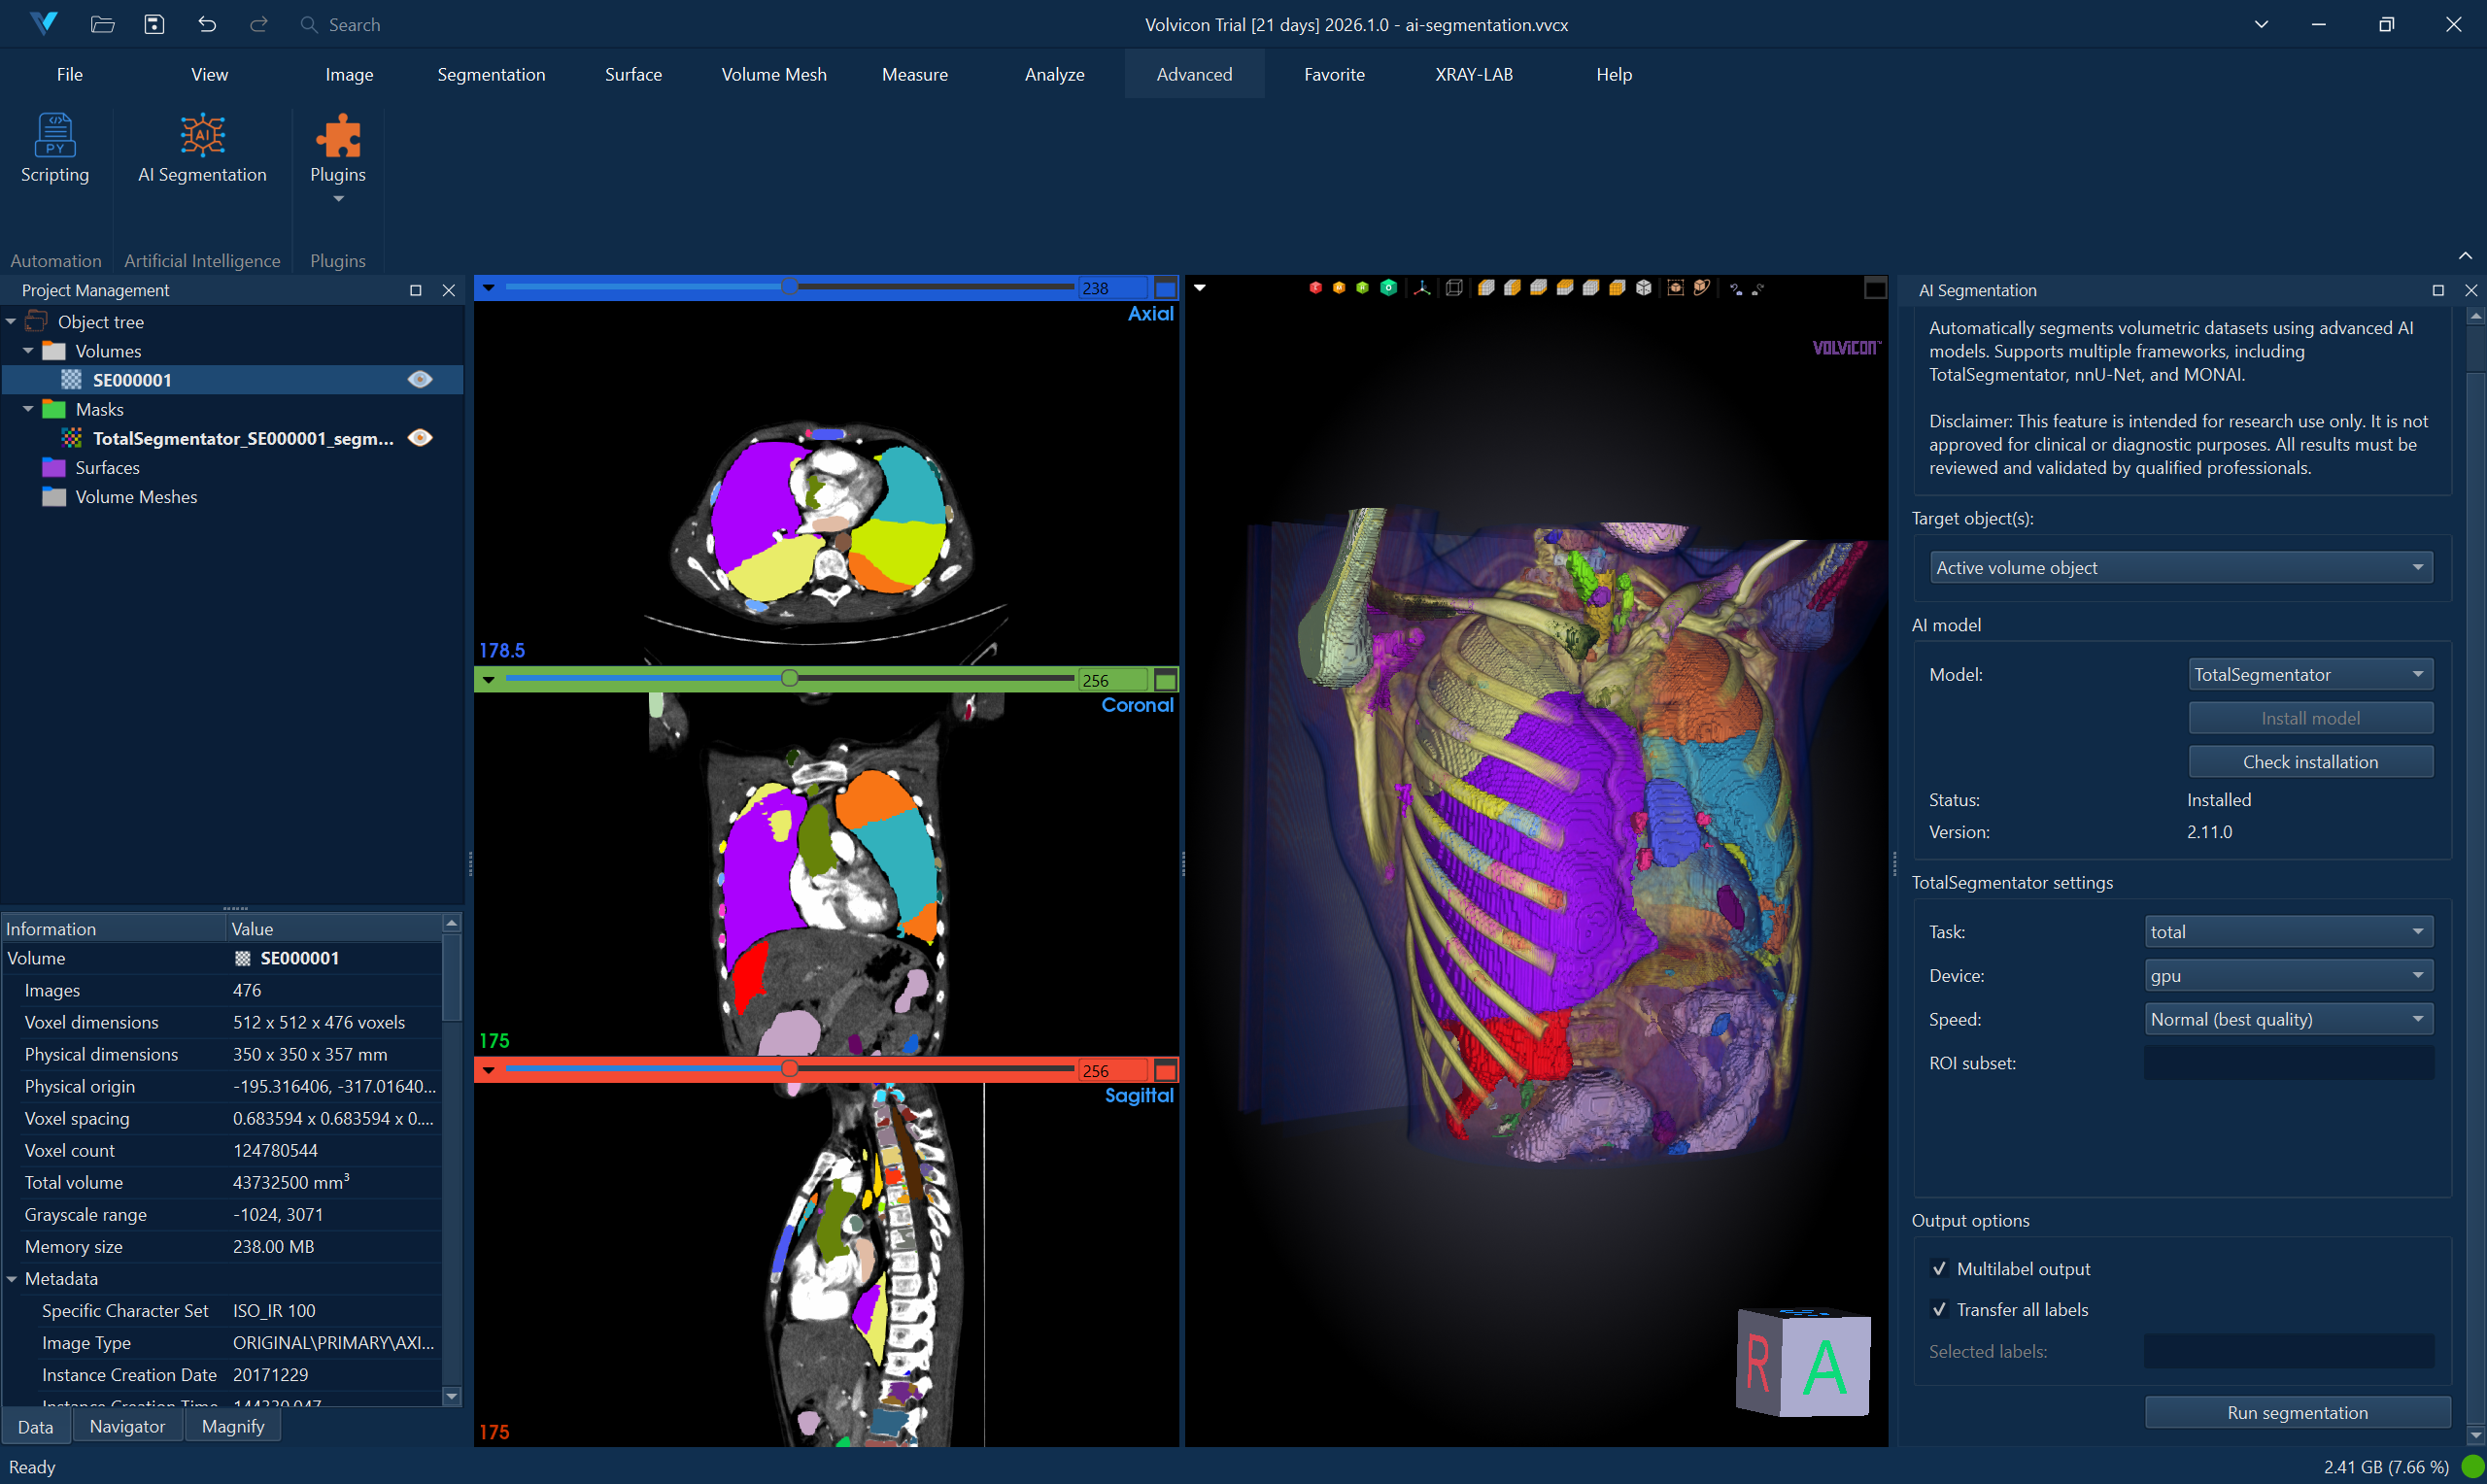
TotalSegmentator
Description
TotalSegmentator provides automatic segmentation of 117 anatomical structures in whole-body CT scans. It's particularly effective for comprehensive anatomical analysis.
Supported Input
- Image Format: NIfTI (.nii, .nii.gz)
- Modality: CT scans
- Anatomy: Whole-body, thorax, or specific anatomical regions
Usage
-
Load CT Image
- Open your CT scan in Volvicon
- Ensure image is in NIfTI format
-
Select TotalSegmentator
- Navigate to AI Segmentation module
- Choose "TotalSegmentator" from framework dropdown
-
Configure Settings
- Task: Select appropriate segmentation task (e.g., "total", "lung_vessels", "body")
- Device: Choose CPU or GPU (if CUDA available)
- Fast Mode: Enable for quicker processing with slightly reduced accuracy
-
Run Segmentation
- Click "Run Segmentation"
- Monitor progress in the output log
- Results will automatically load as segmentation masks
Example Tasks
total- Complete 117-structure segmentationlung_vessels- Detailed lung vessel segmentationbody- Body outline segmentationcerebral_bleed- Cerebral hemorrhage detectionhip_implant- Hip implant segmentationcoronary_arteries- Coronary artery segmentation
Performance Notes
- CPU processing: 5-15 minutes depending on image size
- GPU processing: 2-5 minutes (requires CUDA-compatible GPU)
- Memory requirement: 8-16 GB RAM recommended
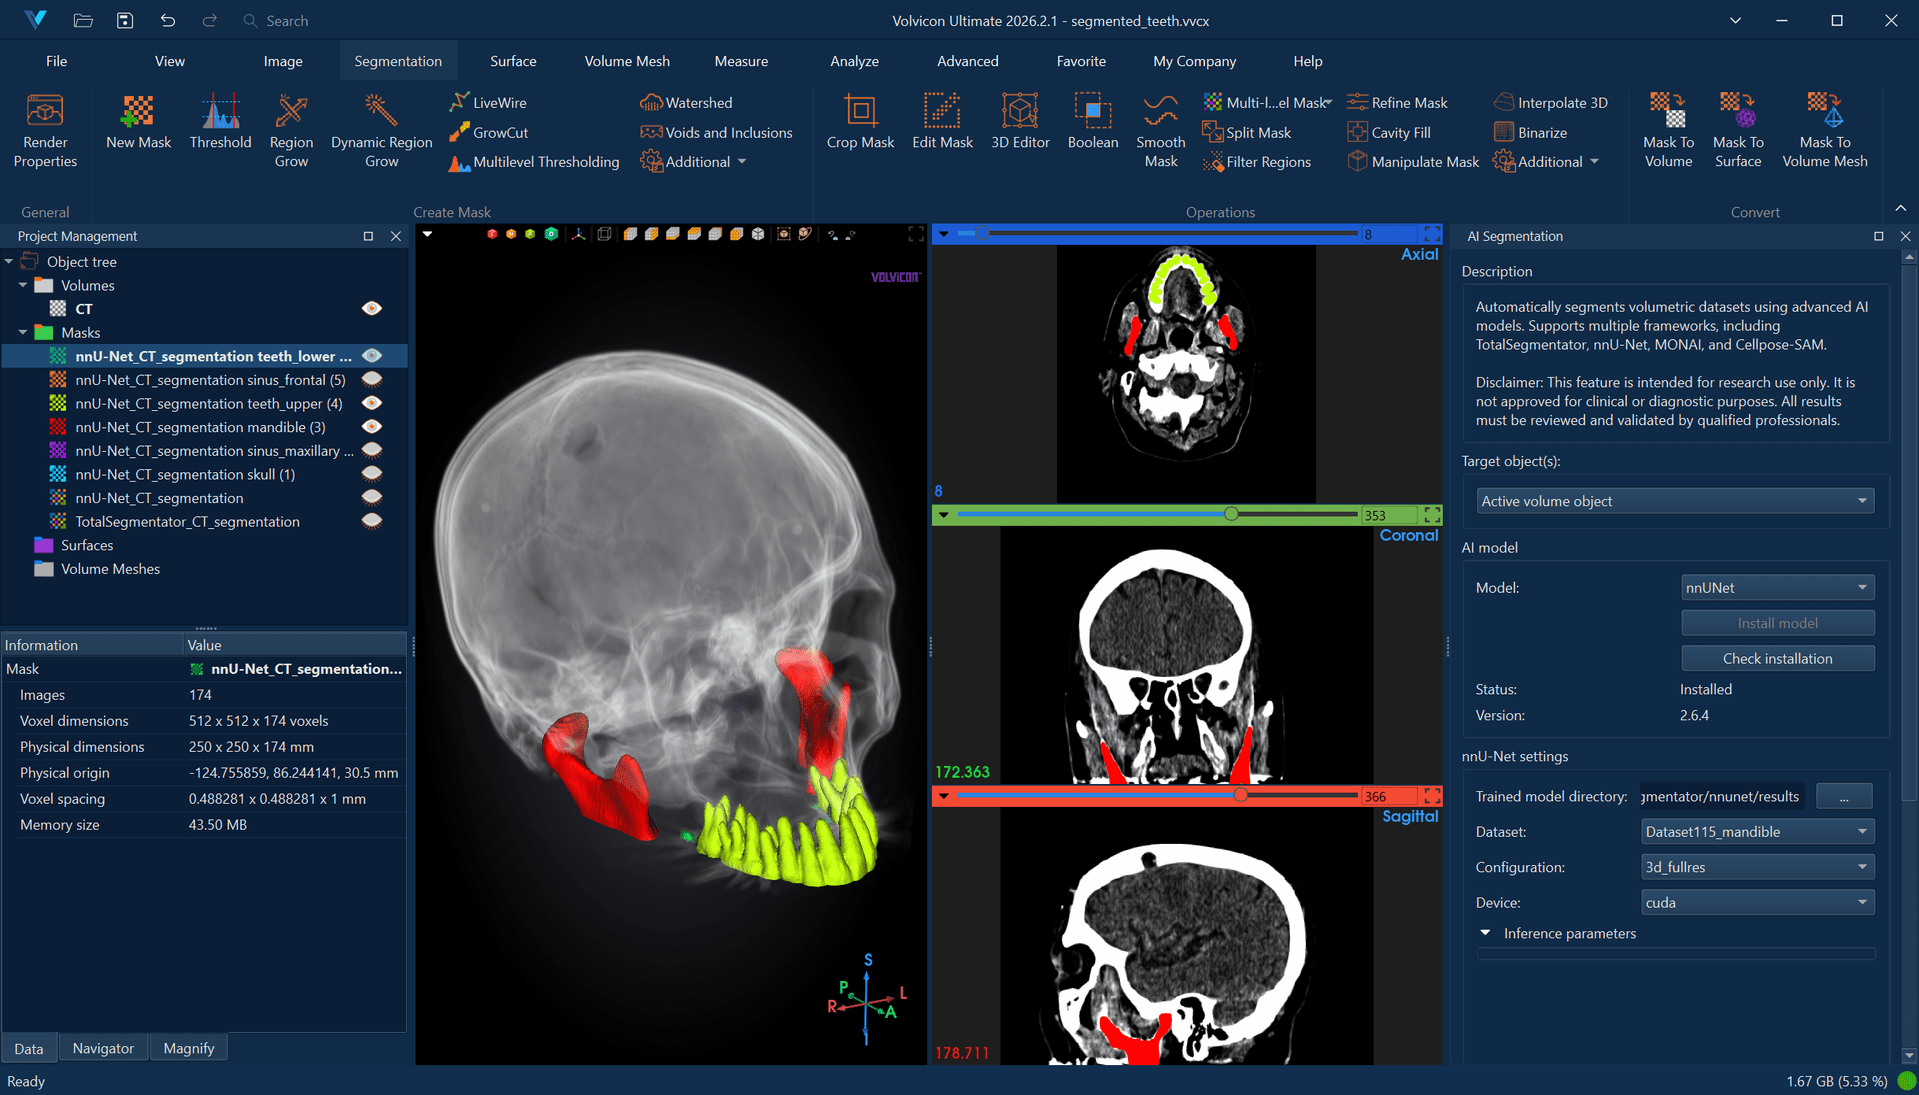
nnU-Net
Description
nnU-Net is a self-configuring deep learning framework that automatically adapts to different medical segmentation tasks. It requires pre-trained models specific to your segmentation task.
Model Requirements
Model Directory Structure
nnU-Net models must be organized in the following structure:
<model_directory>/
├── nnUNetTrainer__nnUNetPlans__3d_fullres/
│ ├── fold_0/
│ │ ├── checkpoint_best.pth
│ │ └── checkpoint_final.pth
│ ├── fold_1/
│ ├── fold_2/
│ ├── fold_3/
│ ├── fold_4/
│ ├── dataset.json
│ ├─��─ plans.json
│ └── predict_from_raw_data_args.json
Obtaining Models
- Download pre-trained models from nnU-Net model repository
- Train custom models using nnU-Net framework
- Ensure model compatibility with your data type
Usage
-
Prepare Model Directory
- Place nnU-Net model in accessible directory
- Verify directory structure matches requirements
-
Load Image
- Open medical image in Volvicon
- Supported formats: NIfTI (.nii, .nii.gz)
-
Configure nnU-Net Settings
- Model Directory: Browse to your nnU-Net model folder
- Configuration: Usually "3d_fullres" for 3D images
- Device: Select CPU or GPU
- Folds: Choose specific fold or "all" for ensemble
- Preprocessing/Segmentation processes (npp/nps): Defaults to
0/0(sequential mode). Increasing these values enables parallel workers but can cause multiprocessing IPC failures on Windows — keep at0/0unless you have confirmed stability with the specific model.
-
Run Segmentation
- Click "Run Segmentation"
- Processing time varies by model complexity
- Results load automatically as segmentation overlay
Model Configuration Types
2d- For 2D slice-based processing3d_fullres- Full resolution 3D processing3d_lowres- Lower resolution 3D for faster processing3d_lowres_high- A model-defined custom configuration used by certain pre-trained models (for example, ToothFairy dental segmentation). Not a standard nnU-Net configuration; availability depends on the installed model.3d_cascade_fullres- Two-stage processing for improved accuracy
nnU-Net Best Practices
npp=0 and nps=0 (sequential mode) are the default in Volvicon and the recommended setting on Windows. Higher values enable parallel preprocessing and export workers, but can produce intermittent multiprocessing IPC failures — particularly with models such as ToothFairy. Increase only when you have confirmed stability on the target system.
- Validate that dataset, trainer, plans, and configuration belong to the same model folder.
- Keep fold selection simple (
fold 0) unless you specifically need multi-fold ensembling. - Prefer GPU for inference speed, but expect fallback to CPU arrays when GPU memory is insufficient.
Troubleshooting nnU-Net
Model Loading Errors
- Verify model directory structure
- Check that
plans.jsonanddataset.jsonexist - Ensure model was trained with compatible nnU-Net version
Memory Issues
- Use
3d_lowresconfiguration for large images - Reduce batch size in model configuration
- Consider using CPU if GPU memory insufficient
Windows Export Worker Errors (WinError 87, SpawnPoolWorker)
- Symptom: Inference computation finishes, but export fails in multiprocessing workers.
- Mitigation: Run with
npp=0andnps=0(sequential mode). - In Volvicon’s nnU-Net runner, this fallback is applied automatically when the known error signature is detected.
See also AI-Powered Segmentation Tutorial and Batch Processing and Automation for scripted and multi-dataset workflows.
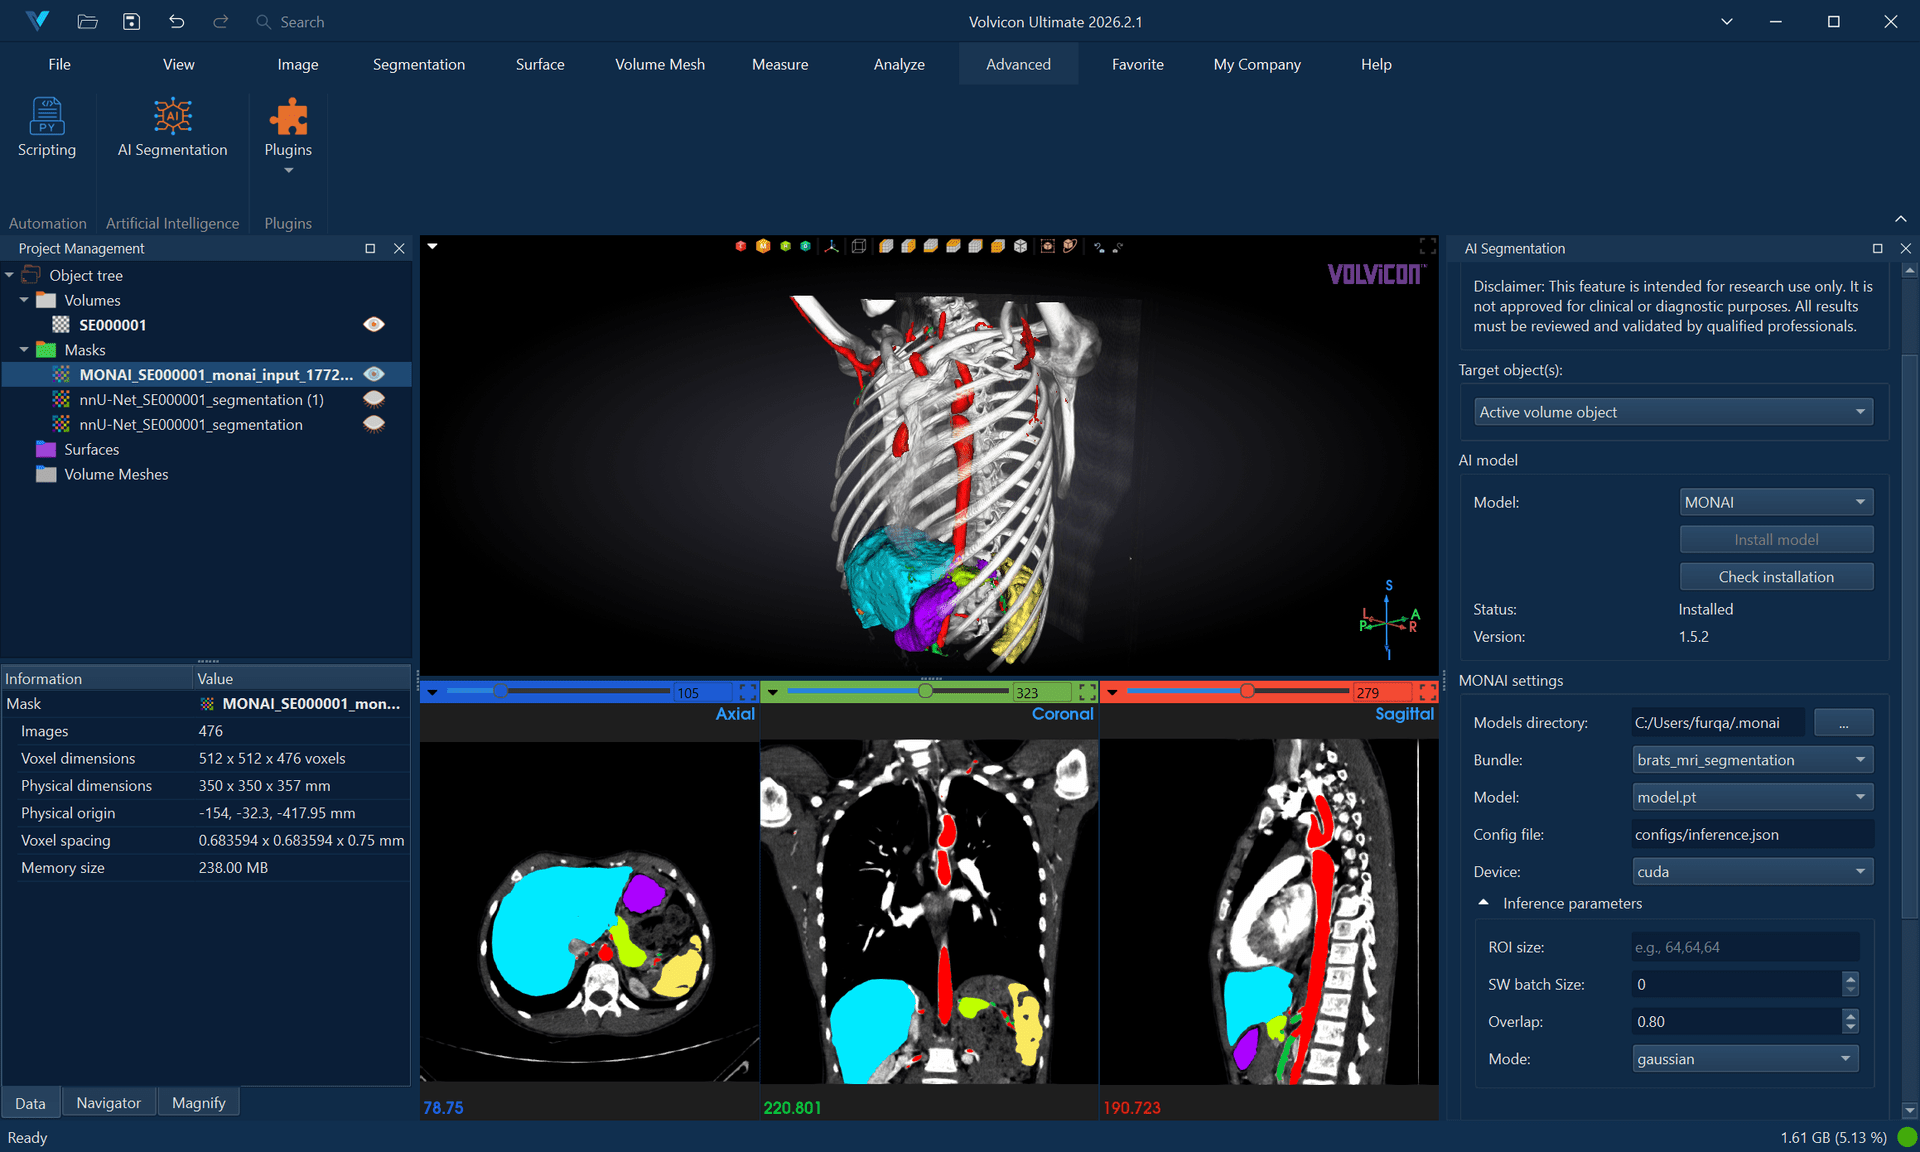
MONAI
Description
MONAI (Medical Open Network for AI) provides access to a comprehensive collection of pre-trained medical AI models. It supports various segmentation tasks across different anatomical regions and imaging modalities.
Supported Models
MONAI bundles are pre-packaged models that include:
- Pre-trained neural networks
- Preprocessing pipelines
- Model metadata and configuration
Popular MONAI Bundles
✅ Example Supported (Single-Channel) Bundles:
wholeBody_ct_segmentation- Multi-organ CT segmentationwholeBrainSeg_Large_UNEST_segmentation- Brain tissue segmentationprostate_mri_anatomy- Prostate MRI segmentation
❌ Example Unsupported Bundle Types:
lung_nodule_ct_detection- Detection models not supportedventricular_short_axis_3label- 2D models not supported- BraTS bundles - Multi-channel models requiring multiple MRI sequences
- Any bundles requiring >1 input channel
Bundle Requirements
Bundle Directory Structure
<bundle_directory>/
├── configs/
│   ├── inference.json
│   ├── metadata.json
│   └── train.json
├── models/
│   └── model.pt
├── scripts/
│   └── (custom Python modules if any)
└── docs/
    └── README.md
Obtaining Bundles
- Download from MONAI Model Zoo
- Use MONAI Bundle CLI tools
- Custom bundles following MONAI specifications
Usage
-
Prepare MONAI Bundle
- Download or prepare MONAI bundle
- Verify bundle structure and completeness
-
Load Medical Image
- Open image in Volvicon
- Supported formats: NIfTI (.nii, .nii.gz)
-
Configure MONAI Settings
- Bundle Directory: Select path to MONAI bundle
- Config File: Usually "configs/inference.json"
- Model File: Usually "models/model.pt"
- Device: Choose CPU or GPU
- ROI Size: Inference patch size (auto-detected from bundle)
-
Advanced Options
- Sliding Window Batch Size: Adjust for memory constraints
- Overlap: Control inference overlap (0.0-1.0)
- Mode: Inference blending mode ("gaussian" or "constant")
-
Run Inference
- Click "Run Segmentation"
- Monitor progress and debug output
- Results appear as segmentation overlay
Model Compatibility
Supported Model Types
-
3D Segmentation Models: ✅ Fully supported
- UNet, SegResNet, SwinUNETR, etc. with 3D spatial dimensions
- Multi-class and binary segmentation for volumetric data
- CT and MRI volume models
-
2D Models: ❌ Not supported
- Models designed for slice-by-slice processing
- 2D UNet, 2D SegResNet variants
- These models expect 2D input but Volvicon processes 3D volumes
-
Multi-Channel Models: ❌ Not supported
- BraTS bundles requiring multiple MRI sequences
- Multi-modal imaging bundles
- Bundles requiring >1 input channel
-
Detection Models: ❌ Not supported
- RetinaNet, YOLO, R-CNN variants
- These models output bounding boxes, not segmentation masks
Custom Networks
MONAI runner supports bundles with custom network architectures:
- Custom Python modules in bundle's
scripts/directory - Automatic path resolution for custom imports
- SwinUNETR and other advanced architectures
Troubleshooting MONAI
Bundle Loading Errors
- Verify bundle directory structure
- Check
inference.jsonandmetadata.jsonexist - Ensure model file
model.ptis present
Network Instantiation Failures
- Check bundle's Python dependencies
- Verify custom network modules are properly structured
- Review error logs for missing parameters
Memory Issues
- Reduce ROI size for large images
- Lower sliding window batch size
- Use CPU if GPU memory insufficient
Detection Model Errors
- MONAI runner only supports segmentation models
- Detection models (bounding box outputs) are rejected
- Use segmentation-specific bundles instead
2D Model Errors
- Error: "2D segmentation model detected"
- Cause: Bundle contains a 2D model designed for slice-by-slice processing, but Volvicon requires 3D volumetric models
- Solutions:
- Use 3D volumetric segmentation bundles instead
- Look for bundles with
spatial_dims: 3in their configuration - For cardiac segmentation: Use 3D cardiac bundles instead of 2D short-axis models
- Check bundle metadata for spatial dimensions before selection
Channel Compatibility Errors
- Error: "Multi-channel bundle detected" or "requires X-channel input"
- Cause: Bundle requires multiple input channels, but Volvicon only supports single-channel images
- Solutions:
- Use single-channel compatible bundles instead
- For brain segmentation: Use
wholeBrainSeg_Large_UNEST_segmentationinstead of BraTS bundles - For multi-organ: Use
wholeBody_ct_segmentationfor CT scans - Check bundle compatibility before selection
Cellpose-SAM
Description
Cellpose-SAM is a general-purpose instance segmentation model combining the Cellpose architecture with the Segment Anything Model (SAM) backbone. Unlike semantic segmentation frameworks that assign class labels to each voxel, Cellpose-SAM performs instance segmentation—identifying and separating individual objects by assigning a unique integer label to each detected instance.

This approach is highly effective for:
- Cell and nuclei segmentation in microscopy images (fluorescence, brightfield, phase contrast).
- Densely packed objects where adjacent instances must be individually distinguished.
- Organoid and particle analysis requiring object counting and morphometric measurement.
- General-purpose object detection in biomedical and industrial imaging contexts.
Cellpose-SAM operates in two modes: 2D mode for single-slice segmentation and 3D mode for volumetric instance segmentation, featuring optional anisotropy correction and slice stitching.
Cellpose-SAM automatically downloads the required model weights (~1.14 GB) upon first use. The model is cached in ~/.cellpose/models/ and requires no manual preparation.
If needed, the model weights can be manually downloaded from cpsam file on Hugging Face. Place the downloaded file in your home directory under C:\Users\UserName\.cellpose\models to enable local use without automatic download.
Supported Input
- Image Format: NIfTI (.nii, .nii.gz)
- Modality: Modality-agnostic — works with CT, MRI, microscopy, and other imaging types
- Dimensionality: 2D slices or 3D volumes
- Channels: Single-channel (grayscale) images. Multichannel (RGB) images are auto-detected and treated as 2D
Usage
2D Mode
-
Load Image
- Open the image in Volvicon.
- Navigate to the target slice.
-
Select Cellpose-SAM
- Navigate to the AI Segmentation module.
- Select "Cellpose-SAM" from the framework dropdown.
-
Configure 2D Settings
- Mode: Select "2D".
- Slice Index: Set to
-1to process the currently active slice, or specify an exact slice number. - Device: Choose CPU or GPU (CUDA).
- Adjust detection thresholds as necessary (refer to Parameters below).
-
Run Segmentation
- Click "Run Segmentation".
- The output mask will contain labeled instances exclusively on the selected slice. All other slices remain empty (value 0).
3D Mode
-
Load Volumetric Image
- Open the 3D volume in Volvicon.
-
Select Cellpose-SAM
- Navigate to the AI Segmentation module.
- Select "Cellpose-SAM" from the framework dropdown.
-
Configure 3D Settings
- Mode: Select "3D".
- Device: Choose CPU or GPU (CUDA).
- Anisotropy: Define the Z-to-XY spacing ratio for non-isotropic volumes (e.g.,
2.5if Z-spacing is 2.5× the XY-spacing). - Stitch Threshold: Set to
0.0for native 3D segmentation, or approximately0.9for 2D-to-3D slice stitching. - Adjust detection thresholds as necessary (refer to Parameters below).
-
Run Segmentation
- Click "Run Segmentation".
- The result is a volumetric instance mask where each detected object is assigned a unique label.
Native 3D vs. Stitch Mode: When Stitch Threshold is 0.0, Cellpose utilizes native 3D convolutions for volumetric segmentation. When set to a nonzero value (e.g., 0.9), Cellpose segments each Z-slice independently in 2D and subsequently stitches masks across slices using Intersection over Union (IoU) matching. Stitch mode is computationally faster and requires less memory, though it may yield less spatially coherent results.
Parameters
| Parameter | Default | Range | Description |
|---|---|---|---|
| Mode | 3D | 2D, 3D | Segmentation dimensionality. Use 2D for single-slice segmentation or 3D for volumetric processing. |
| Device | cpu | cpu, gpu | Processing device. GPU execution requires a CUDA-compatible NVIDIA GPU. |
| Flow Threshold | 0.4 | 0.0–5.0 | Controls mask quality filtering. Lower values (0.1–0.3) accept only high-confidence masks; higher values (0.5–1.0) include uncertain detections. |
| Cell Probability Threshold | 0.0 | −6.0–6.0 | Minimum probability for a pixel to be considered part of an object. Negative values detect larger/more objects; positive values detect smaller/fewer objects. |
| Diameter | 0 (auto) | ≥ 0 | Expected object diameter in pixels. Set to 0 for automatic size estimation. Manual specification improves accuracy when object size is known. |
| Min Size | 15 | ≥ −1 | Minimum object area in pixels. Objects smaller than this threshold are discarded. Set to -1 to disable size filtering. |
| Exclude on Edges | false | true, false | When enabled, discards any mask touching the image boundary. Useful for excluding incomplete objects at the periphery. |
| Batch Size | 8 | ≥ 1 | Number of 256×256 image tiles processed simultaneously on the GPU. Higher values increase throughput but require more VRAM. |
| Anisotropy | 1.0 | > 0 | Z-to-XY voxel spacing ratio for 3D mode. Set to the ratio of Z-spacing to XY-spacing (e.g., 2.0 if Z is 2× coarser). Applicable only in 3D mode. |
| Stitch Threshold | 0.0 | 0.0–1.0 | IoU threshold for stitching 2D masks into 3D objects. 0.0 utilizes native 3D segmentation; values around 0.9 enable slice stitching. Applicable only in 3D mode. |
| Slice Index | -1 | ≥ −1 | Target slice for 2D mode. -1 processes the currently active slice. Applicable only in 2D mode. |
Parameter Tuning Guide
Insufficient object detection?
- Lower
Cell Probability Threshold(e.g., from0.0to-2.0). - Increase
Flow Threshold(e.g., from0.4to0.8). - Reduce
Min Sizeto retain smaller objects.
Excessive false positives?
- Raise
Cell Probability Threshold(e.g., from0.0to2.0). - Lower
Flow Threshold(e.g., from0.4to0.2). - Increase
Min Sizeto filter out spurious detections.
Objects merging together?
- Specify
Diametermanually if auto-estimation overestimates size. - Lower
Flow Thresholdto enforce stricter mask boundaries.
Incomplete objects at boundaries?
- Enable
Exclude on Edgesto discard truncated objects at the image periphery.
3D segmentation performance or memory issues?
- Utilize Stitch Mode (
Stitch Threshold ≈ 0.9) instead of native 3D processing. - Reduce
Batch Sizeto lower GPU memory consumption. - Switch to CPU processing if GPU memory is insufficient.
Performance Notes
- CPU Processing (3D): 5–30 minutes, depending on volume size and object density.
- GPU Processing (3D): 1–10 minutes with a CUDA-compatible GPU.
- 2D Processing: Typically completes within seconds.
- System Memory: 8–16 GB RAM recommended; large 3D volumes may require 32 GB.
- GPU Memory: 4–8 GB VRAM recommended; reduce
Batch Sizeif out-of-memory errors occur. - Initial Execution: The first run downloads the model (~1.14 GB), requiring additional time based on network speed.
Troubleshooting Cellpose-SAM
No Masks Produced
- Lower
Cell Probability Threshold(e.g., −2.0) to increase detection sensitivity. - Increase
Flow Thresholdto accept lower-confidence masks. - Verify that the input image contains visible objects with sufficient contrast.
- Ensure
Diameteris appropriate for the target objects (or set to0for auto-detection).
All Masks Removed by Edge Exclusion
- Error: "Segmentation produced masks, but all were removed by the exclude-on-edges filter."
- Cause:
Exclude on Edgesis enabled, and every detected object touches the image boundary. - Solution: Disable
Exclude on Edges, or crop the image to ensure complete objects are within the field of view.
CUDA / GPU Errors
- Verify the presence of a CUDA-compatible NVIDIA GPU.
- Update GPU drivers to the latest version.
- Switch to CPU processing if a compatible GPU is unavailable.
- Reduce
Batch Sizeif encountering GPU out-of-memory (OOM) errors.
Memory Issues in 3D Mode
- Enable Stitch Mode (
Stitch Threshold ≈ 0.9) to reduce peak memory usage. - Lower
Batch Sizeduring GPU processing. - Process a smaller region of interest (ROI) or utilize 2D mode for individual slices.
- Switch to CPU processing to leverage system RAM instead of GPU VRAM.
Model Download on First Run
- Cellpose-SAM automatically downloads the
cpsammodel during its initial execution. - The model is cached in
~/.cellpose/models/and reused for subsequent runs. - Ensure stable internet connectivity for the initial download.
General Usage Guidelines
Input Requirements
Image Format
- Primary: NIfTI format (.nii, .nii.gz)
- Quality: Medical-grade DICOM converted to NIfTI
- Orientation: Standard radiological orientation preferred
Image Properties
- Resolution: Appropriate for chosen model
- Contrast: Adequate tissue contrast for segmentation
- Artifacts: Minimal motion or metal artifacts
- Dimensions: 3D volumetric data required (except Cellpose-SAM, which also supports 2D)
- Supported: 3D CT volumes, 3D MRI volumes, 2D slices (Cellpose-SAM only)
- Unsupported: 2D slices for TotalSegmentator, nnU-Net, and MONAI
- Channels: Single-channel (grayscale) images only
- Supported: CT scans, individual MRI sequences (T1, T2, FLAIR, etc.)
- Unsupported: Multi-channel bundles requiring multiple imaging sequences
Performance Optimization
Hardware Recommendations
- CPU: Multi-core processor (8+ cores recommended)
- RAM: 16-32 GB for complex segmentations
- GPU: CUDA-compatible GPU with 8+ GB VRAM (optional but recommended)
- Storage: SSD recommended for faster I/O
Processing Tips
- GPU Acceleration: Use GPU when available for significantly faster processing
- Batch Processing: Process multiple similar images with same settings
- Memory Management: Close unnecessary applications during processing
Output and Results
Segmentation Output
- Results appear as overlay on original image
- Multiple tissue classes shown in different colors
- Segmentation masks saved in project workspace
Result Validation
- Review segmentation accuracy visually
- Adjust visualization settings for better inspection
- Manual correction tools available for refinement
Support and Troubleshooting
Common Issues
Installation Problems
- Run as Administrator: Most installation issues resolve with admin privileges
- Clean Installation: Delete virtual environment and reinstall
- Network Issues: Verify internet connectivity and firewall settings
Runtime Errors
- Memory Errors: Reduce processing parameters or use CPU
- Model Errors: Verify model/bundle integrity and compatibility
- Format Errors: Ensure input images are in NIfTI format
- 2D Model Errors: Use 3D volumetric models instead of 2D slice-based models
- Detection Model Errors: Use segmentation models instead of detection/classification models
- No Masks (Cellpose): Adjust flow threshold and cell probability threshold for sensitivity
- Edge Exclusion Removed All Masks (Cellpose): Disable exclude-on-edges or ensure objects are fully within the field of view
Performance Issues
- Slow Processing: Enable GPU acceleration if available
- High Memory Usage: Reduce batch sizes and ROI dimensions
- Long Wait Times: Consider using fast modes where available
Empty or poor segmentation output
Actions:
- Verify input modality/model compatibility.
- Confirm model resources are valid (bundle/model folder/task).
- For Cellpose-SAM, tune
cellprob_threshold,flow_threshold, anddiameter.
Operational recommendations
- Keep framework versions and project workflows stable within a release cycle.
- Validate each new model/task combination on reference cases before batch processing.
- Save parameter presets for repeatability across teams.
Getting Help
Log Files
- Check Volvicon application logs for detailed error information
- AI framework logs provide specific model execution details
- Save relevant log sections when reporting issues
Documentation Resources
- Framework-specific documentation:
Technical Support
- Contact Volvicon technical support with specific error messages
- Include system specifications and framework versions
- Provide sample data and model information when possible
Version Information
This documentation covers:
- Volvicon AI Segmentation Module 2026.2.1
- TotalSegmentator v2.11+
- nnU-Net v2.6.2+
- MONAI v1.5+
- Cellpose-SAM v4.0.8+
For the latest updates and version compatibility, refer to the Volvicon release notes and framework documentation.
References and Citation
TotalSegmentator
Wasserthal, J., Breit, H.-C., Meyer, M. T., Pradella, M., Hinck, D., Sauter, A. W., Heye, T., Boll, D. T., Cyriac, J., Yang, S., Bach, M., & Segeroth, M. (2023). TotalSegmentator: Robust segmentation of 104 anatomic structures in CT images. Radiology: Artificial Intelligence, 5(5). https://doi.org/10.1148/ryai.230024
Authors:
- Jakob Wasserthal, PhD (https://orcid.org/0000-0002-9921-5698)
- Hanns-Christian Breit, MD (https://orcid.org/0000-0003-3612-1341)
- Manfred T. Meyer, MD (https://orcid.org/0009-0007-1858-0030)
- Daniel Hinck (https://orcid.org/0009-0003-1547-8103)
- Alexander W. Sauter, MD (https://orcid.org/0000-0002-6707-2258)
- Tobias Heye, MD (https://orcid.org/0000-0001-9949-0545)
- Daniel T. Boll, MD (https://orcid.org/0000-0001-8806-5826)
- Joshy Cyriac, MSc (https://orcid.org/0000-0002-4584-0623)
- Martin Segeroth, MD (https://orcid.org/0000-0001-7820-2778)
Publication Date: July 5, 2023
Access: Free access — Original Research
nnU-Net
Isensee, F., Jaeger, P. F., Kohl, S. A. A., Petersen, J., & Maier-Hein, K. H. (2021). nnU-Net: A self-configuring method for deep learning-based biomedical image segmentation. Nature Methods, 18(2), 203–211.
https://doi.org/10.1038/s41592-020-01008-z
MONAI
Cardoso, M. J., Li, W., Brown, R., Ma, N., Kerfoot, E., Wang, Y., Murrey, B., Myronenko, A., Zhao, C., Yang, D., Nath, V., He, Y., Xu, Z., Hatamizadeh, A., Zhu, W., Liu, Y., Zheng, M., Tang, Y., Yang, I., ... Zhou, S. K. (2022). MONAI: An open-source framework for deep learning in healthcare. arXiv Preprint.
https://doi.org/10.48550/arXiv.2211.02701
Citation Key: arXiv:2211.02701 [cs.LG]
Submission Date: November 4, 2022
Categories: Machine Learning (cs.LG), Artificial Intelligence (cs.AI), Computer Vision and Pattern Recognition (cs.CV)
Cellpose-SAM
Pachitariu, M., Rariden, M., & Stringer, C. (2025). Cellpose-SAM: Superhuman generalization for cellular segmentation. BioRxiv.
https://doi.org/10.1101/2025.04.28.651001