Deviation Analysis
The Deviation Analysis tool compares two objects to quantify geometric differences, displaying closest-surface distance deviations as color-mapped visualizations with statistical summaries. This analysis supports quality control, manufacturing validation, reverse engineering verification, and other workflows requiring quantitative comparison between actual and reference geometries.
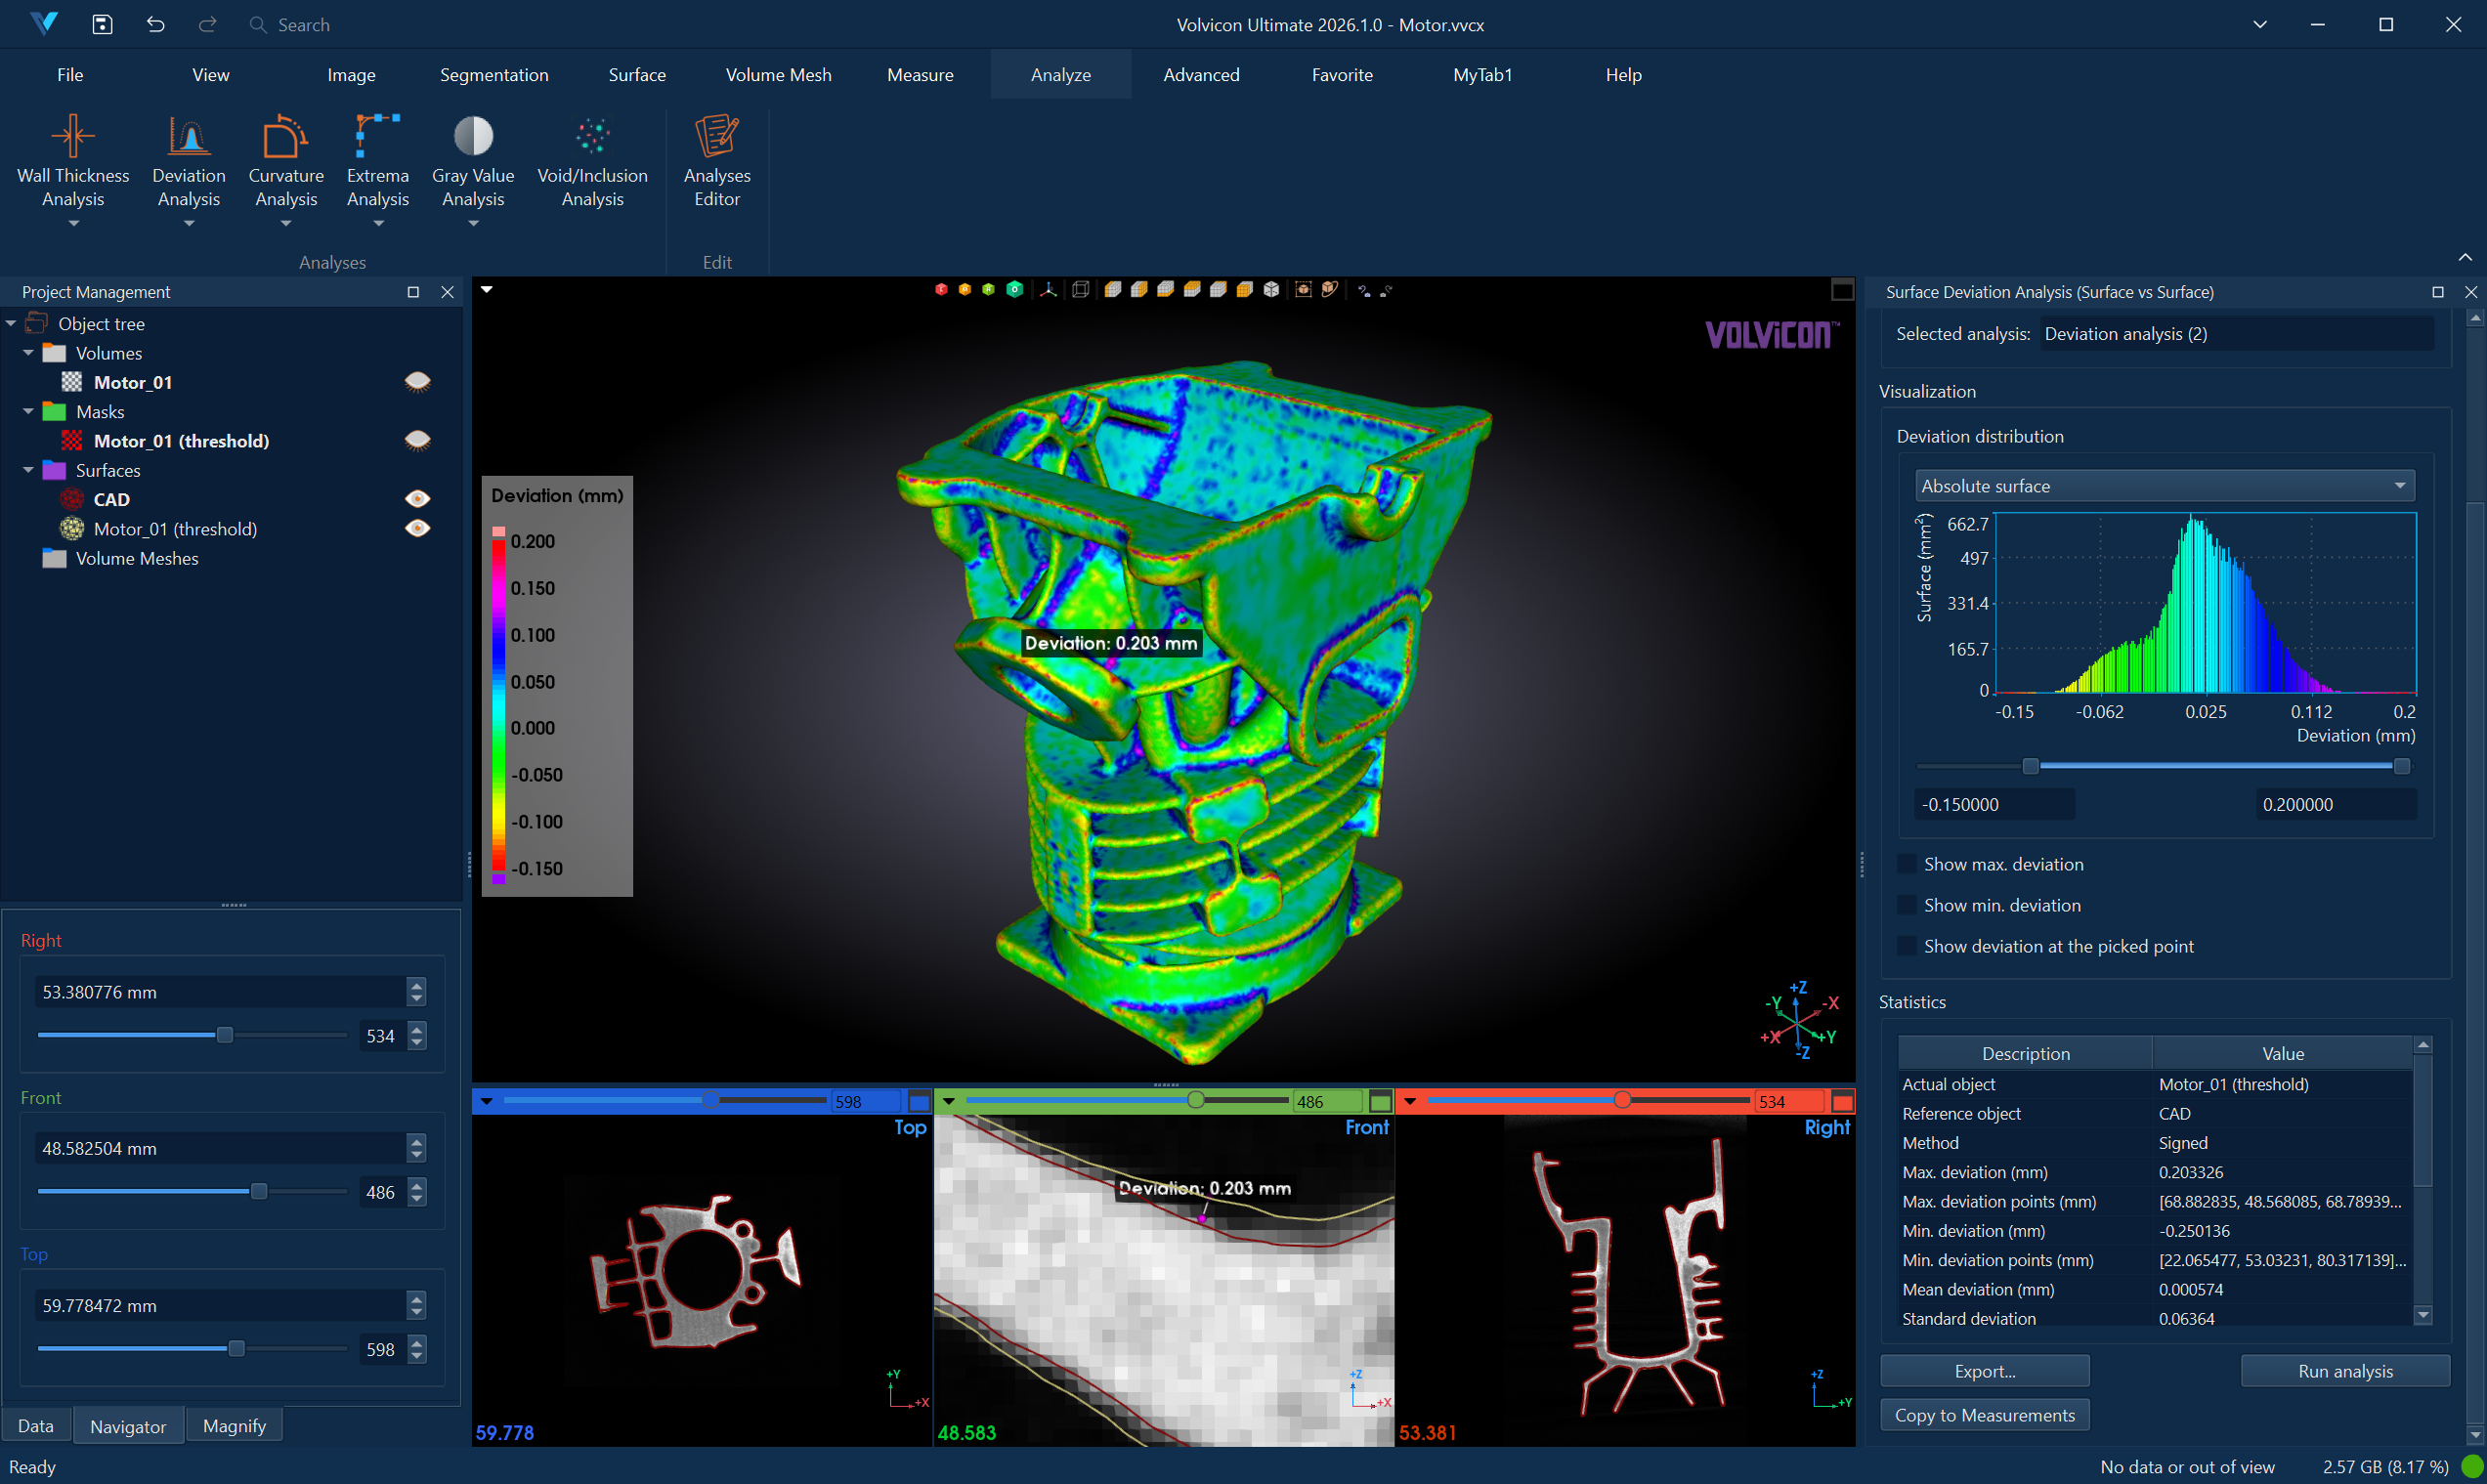
Understanding Deviation Measurement
Deviation analysis – also known as nominal-actual comparison – measures each vertex on the actual object against the closest location on the reference surface. It does not approximate the result using the closest reference vertex. The results reveal how much the actual geometry differs from the reference, with positive and negative values (in signed mode) indicating the side of the oriented reference surface.
The analysis maps deviations to the actual object's surface for immediate visual identification. Summary statistics are weighted by the actual surface area, so densely sampled regions do not receive disproportionate weight. Tolerance-area percentages integrate the linearly interpolated vertex deviations across each triangle instead of assigning a whole triangle from a single vertex value.
Interactive measurement is not restricted to the vertices of the actual object. Picking a point measures the exact position where the surface was clicked, including positions inside a triangle, and reports the exact closest position found on the reference surface. Coarsely tessellated objects can therefore be probed anywhere without first refining the mesh. Because the picked value is measured at the clicked position rather than read from the color map, it can differ from the color shown there on a coarse mesh, where the color map and the area percentages interpolate between vertex values.
Scripting results use the same statistics as the application. Each exported vertex sample includes its represented surface-area weight so the reported mean and population standard deviation can be reproduced from the sample data.
Deviation analysis results are provided for quality assessment and research purposes. Results should be validated by qualified engineers or metrologists before making manufacturing acceptance decisions. Measurement accuracy depends on mesh quality, object alignment, and algorithm parameters.
Comparison Modes
The tool supports three comparison configurations:
| Mode | Actual Object | Reference Object | Use Case |
|---|---|---|---|
| Mask vs. Mask | Mask (3D preview) | Mask (3D preview) | Compare two segmented structures |
| Mask vs. Surface | Mask (3D preview) | Surface mesh | Compare segmentation against CAD or imported geometry |
| Surface vs. Surface | Surface mesh | Surface mesh | Compare two surface models directly |
Accessing the Tool
- Navigate to the Analyze ribbon tab.
- Click the Deviation Analysis button.
- Select the comparison mode from the dropdown menu:
- Mask vs. Mask – Compare two mask objects using their 3D preview surfaces.
- Mask vs. Surface – Compare a mask object against a surface mesh.
- Surface vs. Surface – Compare two surface mesh objects.
Analysis Configuration
Creating a New Analysis
- In the Analysis Selection section, click Select analysis to open the Deviation Analysis Editor dialog.
- Click New Analysis to create a new analysis configuration.
- Configure the analysis parameters (detailed below).
- Click Load to load the selected analysis and close the dialog.
Analysis Parameters
The Deviation Analysis Editor provides the following configuration options:
| Parameter | Description |
|---|---|
| Analysis Name | User-defined name for the analysis. Double-click to rename. |
| Actual Object | The object being evaluated (mask or surface depending on mode). |
| Reference Object | The reference geometry to compare against. |
| Surface Quality | (Mask-based modes only) Quality of the 3D preview surface: Optimal, High, Medium, or Low. |
| Method | Deviation calculation method: Signed or Unsigned. |
| Above Max. Range Color | Color displayed for deviation values above the visualization range. |
| LUT | Lookup table (color map) for visualizing deviation values. |
| Below Min. Range Color | Color displayed for deviation values below the visualization range. |
| Tolerance Limits | Opens the Deviation Tolerance Limits dialog of the analysis. Tolerance evaluation is optional, so the limits are edited there instead of in the row. Hover over the button to see the current limits. See Tolerance Evaluation. |
| Range (mm) | Current visualization range (read-only, updated after analysis). |
Calculation Methods
Signed Distance
The Signed method calculates directional deviation:
- Positive values: Points on the side indicated by the reference surface normals. For a closed reference with outward-facing normals, this is outside.
- Negative values: Points on the opposite side. For a closed reference with outward-facing normals, this is inside.
- Zero: Points that coincide with the reference surface.
This method is ideal for:
- Identifying whether manufacturing added or removed material
- Detecting shrinkage vs. expansion
- Understanding directional differences
Signed results require a consistently oriented reference mesh. A closed, manifold reference must have outward-facing normals for the outside-positive convention; inward-facing normals reverse all signs. Open surfaces use their local normal direction. On non-manifold or inconsistently oriented meshes, the sign near topology defects can be ambiguous; use unsigned distance when only magnitude is required.

Unsigned Distance
The Unsigned method calculates absolute deviation:
- All values are non-negative: Represents the absolute distance from actual to reference.
- Zero: Points that coincide with the reference surface.
This method is useful when:
- Only the magnitude of deviation matters
- Comparing objects where inside/outside distinction is not meaningful
- Creating tolerance bands around a nominal geometry
Use Signed distance when you need to understand whether deviations are inward or outward. Use Unsigned when you only care about the magnitude of deviation regardless of direction.
Tolerance Evaluation
Tolerance evaluation classifies every measured deviation against two nested bands and reports how much of the analyzed surface falls into each one. It is optional and off by default.
| Classification | Condition |
|---|---|
| In tolerance | The deviation lies inside the lower and upper tolerance limits. |
| Out of tolerance | The deviation is outside the tolerance limits but still inside the critical limits. |
| Critical | The deviation is outside the critical limits. |

To set it up, click the button in the Tolerance Limits column of the analysis in the Deviation Analysis Editor. The dialog that opens holds the whole tolerance setup: the check box that turns the evaluation on, the lower and upper permissible deviation, and the lower and upper critical deviation. Limits are entered in millimeters and follow the sign convention of the selected calculation method, so a Signed analysis normally uses a negative lower limit and a positive upper limit, while an Unsigned analysis uses limits at or above zero.
The two limits of a band are kept in order while you edit them. When you save the analysis, the critical limits are expanded as needed to enclose the tolerance limits. Turning the evaluation off keeps the limits, so it can be turned back on at any time.
Tolerance limits are independent of the visualization range. Changing the range slider changes the color mapping only, while the tolerance statistics stay tied to the limits you specified. The limits are stored with the analysis and are restored when the project is reopened.
The area distribution is computed by integrating the deviation across each triangle, so a triangle that straddles a limit contributes its actual area to each side rather than being assigned whole to one of them.
Running the Analysis
- After loading an analysis configuration, click Run Analysis.
- A progress dialog appears while the analysis computes.
- Upon completion:
- The actual object displays color-mapped deviation values in 3D and 2D views.
- The histogram updates with the deviation distribution.
- The statistics table populates with summary metrics.
Ensure both actual and reference objects are properly aligned before running the analysis. Use the Global Registration tool if alignment is needed.
Interpreting Results
Visualization
The actual object displays a color gradient representing deviation values:
For Signed distance:
- Blue/cool colors: Negative deviation (actual is inside reference)
- Green/neutral colors: Near-zero deviation (good conformance)
- Red/warm colors: Positive deviation (actual is outside reference)
For Unsigned distance:
- Blue/cool colors: Low deviation (good conformance)
- Red/warm colors: High deviation (poor conformance)
Use the histogram range sliders to focus on specific deviation intervals.
By default, the deviation distribution is shown as bars in the Interactive Histogram Chart. The bars carry the colors of the color map, so the chart and the color-mapped object can be read together. Scroll to zoom, drag inside the plot to evaluate a deviation interval, and right-click to reach the display options and the export actions.
Statistics
The statistics table displays key metrics:
| Statistic | Description |
|---|---|
| Actual Object | Name of the evaluated object. |
| Reference Object | Name of the reference object. |
| Method | Signed or Unsigned calculation method. |
| Max. Deviation (mm) | Largest positive deviation value. |
| Max. Deviation Points | Coordinates of the maximum deviation location. |
| Min. Deviation (mm) | Smallest deviation value (most negative for signed). |
| Min. Deviation Points | Coordinates of the minimum deviation location. |
| Mean Deviation (mm) | Area-weighted average of the actual object's vertex deviation samples. |
| Standard Deviation | Area-weighted variation in deviation values. |
| Range (mm) | Current visualization range. |
| Mean Deviation within Range | Surface-area-weighted average restricted to the selected range. |
| Area Below Min. Range (%) | Percentage of surface below the minimum range. |
| Area Above Max. Range (%) | Percentage of surface above the maximum range. |
| Area Within Range (%) | Percentage of surface within the selected range. |
When tolerance evaluation is enabled, the table adds the following rows:
| Statistic | Description |
|---|---|
| Tolerance Limits (mm) | Lower and upper permissible deviation. |
| Critical Limits (mm) | Lower and upper critical deviation. |
| Area In Tolerance (%) | Percentage of surface inside the tolerance limits. |
| Area Below Tolerance (%) | Percentage of surface below the lower tolerance limit. |
| Area Above Tolerance (%) | Percentage of surface above the upper tolerance limit. |
| Critical Area (%) | Percentage of surface outside the critical limits. |
| Tolerance Status | Overall result: In tolerance, Out of tolerance, or Critical. |
| Picked Point Tolerance Status | Classification of the last picked measurement. Shown only while a point is picked. |
Cumulative Statistics
When using the Cumulative relative surface histogram type, additional statistics appear:
| Statistic | Description |
|---|---|
| Cumulated 90% (mm) | Deviation value at which 90% of surface area is accounted for. |
| Cumulated 95% (mm) | Deviation value at which 95% of surface area is accounted for. |
| Cumulated 98% (mm) | Deviation value at which 98% of surface area is accounted for. |
These percentile values are useful for tolerance specification and pass/fail criteria.
Interactive Features
| Feature | Description |
|---|---|
| Show Maximum | Displays an annotation at the point of maximum deviation. |
| Show Minimum | Displays an annotation at the point of minimum deviation. |
| Pick Point | Enable interactive picking to measure the deviation at any clicked location on the actual object, including positions inside a triangle. The measurement line runs from the clicked position to the closest position on the reference surface. When tolerance evaluation is enabled, the label background is green for in tolerance, amber for out of tolerance, and red for critical. |
Typical Workflows
Manufacturing Quality Control
- Import the CAD reference model as a surface.
- Segment the scanned manufactured part to create a mask.
- Align the actual part to the reference using Global Registration.
- Create a Mask vs. Surface deviation analysis.
- Open Tolerance Limits, turn the evaluation on, and enter the acceptance limits and the critical limits for the part.
- Run the analysis with Signed method.
- Review Tolerance Status, Area In Tolerance (%), and Critical Area (%).
- Pick points on suspect regions to record the exact local deviation and its classification.
- Export a PDF report for quality documentation.
Before/After Comparison
- Segment structures from two different time points.
- Align the datasets using image registration.
- Create a Mask vs. Mask deviation analysis.
- Run with Signed method to see growth vs. shrinkage.
- Use Show Maximum/Minimum to locate areas of greatest change.
Reverse Engineering Validation
- Import the original reference geometry.
- Generate a surface from the reverse-engineered model.
- Align surfaces using Global Registration.
- Create a Surface vs. Surface deviation analysis.
- Run with Unsigned method to assess reconstruction accuracy.
- Review cumulative statistics for overall quality metrics.
Tolerance Band Visualization
- Configure deviation analysis between actual and nominal geometry.
- Open Tolerance Limits, turn the evaluation on, and enter the tolerance and critical limits for the part.
- Set the visualization range to the same tolerance limits (e.g., -0.2 to +0.2 mm) so the color mapping matches the acceptance criteria.
- Points displayed in the range colors are within tolerance, and the below/above range colors immediately highlight out-of-tolerance regions.
- The "Area In Tolerance" and "Critical Area" statistics give the conformance percentages, and "Tolerance Status" gives the overall result.
Exporting Results
CSV Export
Click Export and select CSV to save:
- Statistical summary data
- Deviation distribution histogram data
- Per-point deviation values (optional)
PDF Report
Click Export and select PDF Report to generate a formatted document containing:
- Analysis configuration and comparison parameters
- 3D visualization screenshots
- Histogram and statistics
- Deviation location annotations
- Tolerance limits, area percentages, and tolerance status when tolerance evaluation is enabled
- Per-vertex deviation values and represented surface-area weights when raw analysis data is included
CSV exports, PDF data tables, and scripting-generated result files follow the selected visualization range. Values below the range are reported as -inf, and values above the range are reported as +inf. The scripting API retains the computed numeric sample values for further processing.
A picked point is labeled -inf or +inf when it lies where the object is colored as being below or above the range, so the reported label always agrees with the color under the cursor. Everywhere else it is reported as its numeric value, measured at the clicked position rather than taken from the nearest stored sample.
See PDF Report for detailed report customization options.
Best Practices
-
Align objects before analysis: Misalignment causes systematic deviation that obscures true geometric differences. Use Global Registration for automatic alignment.
-
Match surface quality to requirements: For mask-based analyses, use Optimal quality for final reports and Medium for quick exploration.
-
Choose the appropriate method: Use Signed for directional analysis; Unsigned when only magnitude matters.
-
Set meaningful tolerance limits: Enter the acceptance limits under Tolerance Limits so the reported status and area percentages reflect your criteria, and set the visualization range to the same values for immediate pass/fail visualization.
-
Consider mesh resolution: Both actual and reference meshes should have sufficient resolution to capture the geometric detail you want to measure.
-
Validate mesh topology for signed analysis: Use a closed, consistently oriented reference surface when inside/outside direction matters. Use unsigned analysis for open reference surfaces unless their orientation has been verified.
-
Document comparison parameters: Include alignment method and analysis settings in reports for reproducibility.
Troubleshooting
| Issue | Possible Cause | Solution |
|---|---|---|
| Large systematic deviations | Objects not aligned | Run Global Registration before analysis |
| One-sided deviation values | Signed method with objects swapped | Swap actual and reference objects, or use Unsigned |
| Noisy deviation map | Coarse mesh resolution | Increase surface quality for masks; refine surface meshes |
| Missing data in some regions | Non-overlapping geometry | Ensure objects cover the same spatial region |
| Tolerance rows missing from the statistics | Tolerance evaluation disabled, or limits not ordered | Open Tolerance Limits in the editor, turn the evaluation on, and make sure the critical limits enclose the tolerance limits |
Related Resources
- Analyze Tab Overview – Overview of all analysis tools
- Wall Thickness Analysis – Measure material thickness
- Global Registration – Align objects before comparison
- Interactive Histogram Chart – Reading, navigating, and evaluating the distribution chart
- PDF Report – Generate analysis reports
- Analysis Operations API – Scripting support for analysis automation