Light Studio
Light Studio is the lighting workspace for Volvicon's 3D view. Use it to improve depth perception during inspection, reveal surface detail, or prepare a consistent presentation view. It manages every 3D-view light in one place, with a maximum of eight lights.
Open the View tab and select Light Studio in the Camera section. Light Studio affects the 3D view only; it does not change lighting in the slice views.
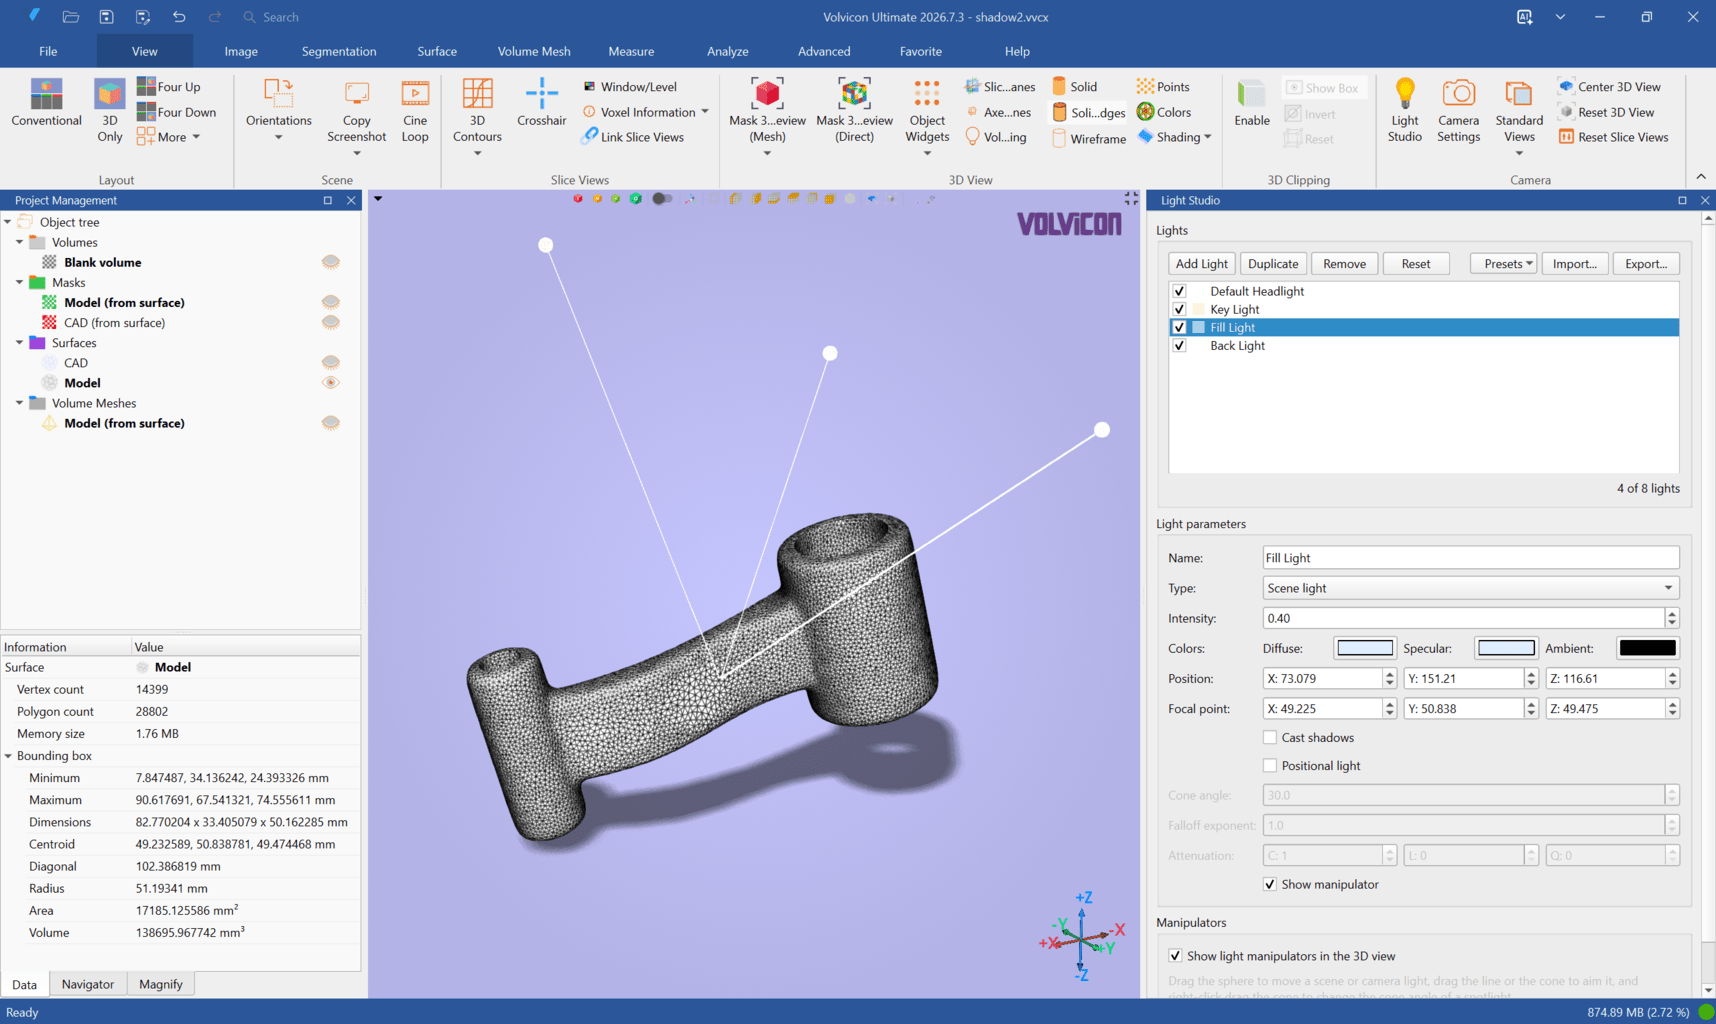
Lighting Model
Every scene starts with a Default Headlight. The headlight shines from the camera and provides readable, even illumination as you orbit the model. It is part of the same light list as all other lights, not a separate lighting system.
The list never remains empty. If you remove its last light or select Reset, Volvicon restores the default headlight. An empty JSON setup is rejected without changing the current lights. Studio presets also include the headlight so fill illumination remains stable while their scene lights shape the object.
The eight-light limit includes the default headlight. For example, Three-Point Studio contains four lights in total: the default headlight plus key, fill, and back lights.
Manage Lights
The light list shows each light's name, color, and enabled state. Select a light to edit it. Clear its checkbox to switch it off without deleting or changing its settings.
| Control | Action |
|---|---|
| Add Light | Adds a scene light after the default headlight; Cast shadows is off |
| Duplicate | Copies every setting; scene and camera light copies are offset so both manipulators remain accessible |
| Remove | Removes the selected light; removing the final light restores the default headlight |
| Reset | Replaces the complete setup with the default headlight |
| Presets | Replaces the complete setup with a ready-made lighting arrangement |
| Import... | Loads and validates a light setup from a JSON file, then replaces the current setup |
| Export... | Saves the complete light setup to a JSON file |
Applying a preset or importing a setup asks for confirmation before replacing current lights.
Choose a Light Type
| Type | Behavior | Typical use |
|---|---|---|
| Scene light | Stays fixed in world space while the camera moves | Stable studio, inspection, and floor-shadow lighting |
| Camera light | Keeps its placement relative to the camera | Lighting that follows an inspection viewpoint |
| Headlight | Shines directly from the camera | Even front illumination and a readable fallback |
Scene and camera lights can be directional or positional. A headlight has no placeable manipulator and cannot produce a useful floor shadow.
Use scene lights for most professional setups. Because the lights stay fixed while you orbit, the changing highlights and shading make surface shape easier to read.
Edit Light Parameters
| Parameter | Description |
|---|---|
| Name | Name displayed in the light list |
| Type | Scene light, camera light, or headlight |
| Intensity | Brightness multiplier; 0 switches off the light's visible contribution without changing its list state |
| Diffuse | Color applied to diffuse surface illumination |
| Specular | Color of reflected highlights |
| Ambient | Color contributed to ambient illumination |
| Position | X, Y, and Z coordinates of the light source |
| Focal point | X, Y, and Z coordinates of the point toward which the light aims |
| Positional light | Changes a directional source at infinity to a positioned spotlight or point light with distance attenuation |
| Cast shadows | Allows an eligible directional light or spotlight to contribute shadows when Floor shadows is enabled |
| Cone angle | Opening angle of a positional spotlight; angles below 90° can cast floor shadows, while 90° or more behaves like a point light |
| Falloff exponent | Controls how illumination fades from the center toward the edge of the spotlight cone |
| Attenuation | Constant, linear, and quadratic distance falloff for a positional light |
| Show manipulator | Shows or hides the selected light's 3D manipulator while Light Studio is open |

Lights created with Add Light start with Cast shadows off, while Duplicate preserves the source light's setting. Each multi-light preset enables shadows on exactly one dominant light; the Default Headlight preset has no caster. You can enable more than one caster in a custom setup, but multiple shadow directions often produce a cluttered or artificial result.
Some volume-rendering modes use only the light direction and do not show every positional-light effect. Surfaces use the positional settings. Floor shadows are limited to opaque surface geometry; volumes do not cast or receive them.
Position Lights Interactively
Scene and camera lights have manipulators in the 3D view while Light Studio is open:
- Drag the sphere to move the light source.
- Drag the line or cone to aim the light. The target snaps to a visible object surface, which makes precise spotlight placement easier.
- Right-click and drag the cone to change a spotlight's cone angle.
The selected light is emphasized. Use Show manipulator for one light or Show light manipulators in the 3D view for the complete overlay. Manipulators are display helpers: they do not affect camera reset or the scene bounds, and they are released when Light Studio closes. The lights themselves remain active.
Studio Presets
Presets replace the current light list. Except for Default Headlight, they combine the default headlight with scene or camera lights arranged for a specific visual goal. Orbit to the intended viewpoint before applying a studio preset; camera-oriented presets are placed relative to the view you currently see.
| Preset | Total lights | Shadow-casting light | Best suited to |
|---|---|---|---|
| Default Headlight | 1 | None | Neutral navigation and a clean starting point |
| Lighting Kit (Classic) | 6 | Key | Familiar balanced key, fill, back, and head lighting |
| Three-Point Studio | 4 | Key | General CAD presentation and surface inspection |
| Four-Point Studio | 5 | Key | Balanced presentation with additional top separation |
| Butterfly (Glamour) | 4 | Key | Symmetrical frontal presentation lighting |
| Rembrandt | 4 | Key | Directional modelling with strong depth cues |
| Split | 4 | Key | High-contrast side lighting |
| Rim Emphasis | 4 | Left Rim | Strong edge separation from the background |
| Top-Down Inspection | 6 | Top Light | Inspecting upward-facing features and assemblies |
| Ring Studio (8 Lights) | 8 | Ring Light 1 | Even illumination around complex shapes |
The non-casting fill, back, rim, and utility lights still illuminate the object. They simply avoid adding extra shadow silhouettes.
Floor Shadows
Floor shadows create the clean presentation effect used by professional CAD tools: the object appears to rest on an environmental surface, but the surface itself blends into the renderer background. There is no visible floor color or horizon line. Opaque surfaces can also shadow one another while the feature is enabled.
- Open Camera Settings from the View tab and select 3D View.
- On the Visualization page, enable Floor shadows.
- Set Align floor with to the real-world support plane:
- XY plane (Z up) for a conventional horizontal Z-up floor.
- XZ plane (Y up) for a Y-up scene.
- YZ plane (X up) for a side-supported or X-up scene.
- Adjust Softness and Darkness for the desired presentation style.
- In Light Studio, confirm that one enabled directional light or spotlight below 90° has Cast shadows selected.
The floor stays fixed in world space when the camera orbits. It sits just below the visible model, cannot be picked, and does not affect measurements, scene bounds, or camera reset. When viewed from below, its back face is hidden so it cannot cover the model.
See 3D View Controller and Settings for the complete Floor shadows settings reference.
Guided Workflows
Create a CAD Presentation View
- Reset the 3D view and orbit to the final presentation angle.
- Open Light Studio and apply Three-Point Studio.
- Select Key Light and drag its sphere to place it above and to one side of the object.
- Reduce the fill light's Intensity for stronger form, or increase it for softer contrast.
- Enable Floor shadows and choose the correct floor alignment.
- Adjust Softness for a natural penumbra and Darkness for the desired contact strength.
- Leave Cast shadows off for the fill and back lights.
Inspect a Vertically Mounted Object
- Apply Top-Down Inspection or Three-Point Studio as a starting point.
- Choose XZ plane (Y up) or YZ plane (X up) to match the mounting surface.
- Move the main shadow-casting light so the shadow falls away from the feature of interest.
- Orbit the camera to confirm that the fixed environmental floor remains correctly oriented.
Build a Focused Spotlight
- Select Add Light and rename the light.
- Enable Positional light.
- Drag the sphere to place the source.
- Drag the cone toward the target surface; the focal point snaps to visible geometry.
- Adjust Cone angle, Falloff exponent, and Attenuation.
- Enable Cast shadows only if this is the setup's intended primary shadow source.
Reuse a Setup Across Projects
- Select Export... and save the JSON setup.
- Open the target project and establish the intended 3D viewpoint.
- Select Import... and choose the saved file.
- Review the replacement confirmation.
- Check light placement against the new object's scale and position.
- Save the project to preserve the imported lights and floor-shadow settings.
Best Practices
- Start with a preset, then change one parameter at a time.
- Use one shadow-casting light for a clear and believable shadow direction.
- Use non-casting fill lights to control contrast without duplicating silhouettes.
- Keep the default headlight at a modest intensity so the object remains readable from all angles.
- Place the key light above and to one side rather than directly behind the camera.
- Align the floor with the object's real support plane before tuning softness or darkness.
- Use lower Quality while arranging a complex scene, then raise it for final review or capture.
- Export approved setups when multiple projects need a consistent presentation style.
Troubleshooting
No floor shadow is visible
- Confirm that Floor shadows is enabled in the 3D View settings.
- Confirm that an enabled directional light or spotlight below 90° has Cast shadows selected. Lights created with Add Light and the default headlight do not cast shadows by default; duplicates preserve the source setting.
- Check that Darkness is greater than 0.
- Aim the casting light so the object lies between the light and the selected floor.
- For a positional light, keep Cone angle below 90°; wider cones behave like point lights and do not produce floor shadows.
- Verify that Align floor with matches the object's support plane.
- Use opaque surface geometry. Volumes do not cast or receive floor shadows.
Shadows look doubled or too busy
Select each light and leave Cast shadows enabled only on the intended key or dominant light. Keep fill and back lights enabled for illumination but disable their shadow contribution.
The model becomes too dark when a light is disabled
Apply a balanced preset or restore Default Headlight, then reduce intensities gradually. The checkbox in the light list switches off all contribution from that light; Cast shadows controls only its floor-shadow contribution.
A manipulator is not visible
- Headlights do not have placeable manipulators.
- Confirm that both Show manipulator and Show light manipulators in the 3D view are enabled.
- Reopen Light Studio if it was closed; manipulators intentionally exist only while the tool is open.
The floor is on the wrong side of the object
Choose the world plane whose named up axis matches the scene: XY for Z up, XZ for Y up, or YZ for X up. The floor remains stationary when the camera moves.
Persistence and Sharing
Project settings preserve the light list, all light parameters, enabled states, per-light Cast shadows choices, and Floor shadows configuration. JSON export includes the complete light setup for sharing independently of a project. Import validates the file before replacing current lights and never creates more than eight lights.
Related Topics
- Camera – Camera parameters, standard views, and reset controls
- 3D View Controller and Settings – Rendering and Floor shadows options
- 3D View – Surface, volume, and representation controls
- View Tab Overview – Complete View tab reference