The 2D Views
The 2D views display cross-sectional slices through volume data. Each view shows a different plane orientation.

Slice Orientations
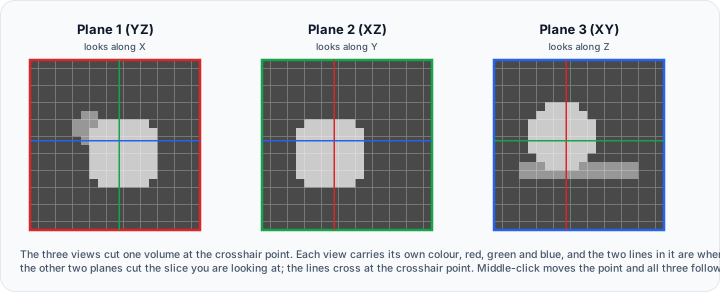
Volvicon provides three orthogonal slice views. Their names come from the orientation preset selected in View → Scene → Orientations:
| Plane | Slices are orthogonal to | Name under an engineering preset | Name under a medical preset |
|---|---|---|---|
| YZ | The X axis | Right | Plane 1 (YZ) |
| XZ | The Y axis | Front | Plane 2 (XZ) |
| XY | The Z axis | Top | Plane 3 (XY) |

Each view carries an accent colour that is reused by its crosshair line, its slice plane in the 3D view, and its corner text: red for the YZ plane, green for the XZ plane, and blue for the XY plane.
Navigation Controls
Mouse Controls
| Action | Mouse | Description |
|---|---|---|
| Step through slices | Scroll wheel | Moves one slice forward or backward |
| Zoom | Right-drag | Zooms in (drag up) or out (drag down), centred on the pointer |
| Set the crosshair centre | Middle-click | Moves the other two views to the clicked point, while the crosshair is enabled |
| Pan | Middle-drag | Moves the view. Available while the crosshair is disabled, because the crosshair takes the middle button |
| Window/Level | Left-drag | Adjusts window (horizontal) and level (vertical), while Window/Level is enabled and the display mode is Standard |
| Context menu | Right-click without dragging | Opens the slice view menu |
Keyboard Shortcuts
| Shortcut | Action |
|---|---|
R | Fit and reset the slice view that has focus |
Shift+R | Fit and reset all three slice views |
Alt (held) | Move the crosshair centre with the pointer, while the crosshair is enabled |
Ctrl+Space | Maximize or restore the active slice view |
F11 | Detach the active slice view into its own window |
Ctrl+Alt+Space | Show the active slice view full screen |
Slice Navigation
Slice Slider
Every slice view carries a slider and a slice number box in its top bar, between the view controller arrow on the left and the maximize button on the right. Drag the slider, click along it, or type into the box to jump to a slice; both respond to the arrow keys and to Page Up and Page Down once they have focus.
The tooltip of the slider and the box names the plane the view steps through, so it always matches the orientation preset in use.
Crosshairs
Crosshairs link the three 2D views:
- The intersection point is synchronized across all views
- Click in one view to update the crosshair position in all views
- Use crosshairs to navigate to specific locations in 3D
Enable/disable crosshairs from the View ribbon tab.
Display Options
Window/Level (Brightness/Contrast)
Window and level control how intensity values are displayed:
| Term | Description |
|---|---|
| Window (Width) | Range of intensities displayed |
| Level (Center) | Midpoint of the displayed range |
Adjust by left-dragging while the Window/Level panel is open:
- Horizontal movement changes window (contrast)
- Vertical movement changes level (brightness)
Dragging has no effect while a gray value interval mode is selected under Slice Display, because those modes define the displayed colors themselves.
See Window/Level for the control panel, its presets, and its lookup tables.
Presets
Use preset window/level values for common visualization needs.
Slice Display
The slice display mode selects how gray values are mapped to colors. It is shared by all three slice views and is stored with each volume.
| Mode | Description |
|---|---|
| Standard | Brightness, contrast, and color of the volume itself; window and level are available |
| Gray Value Intervals | Colors assigned to the gray value intervals, at full strength |
| Gray Value Intervals with Opacity | Interval colors weighted by their opacity curves, so the curves define the contrast |
The two interval modes use the intervals defined on the Render page of Render Properties and also apply to the slice planes in the 3D view. While one of them is active, the window and level settings are turned off; the values are kept, so switching back to Standard restores the previous display.
Choose the mode from the View ribbon tab, the Visibility menu of a 2D view controller, or the right-click menu of a slice view. Opening Window/Level or Render Properties while the mode does not suit that tool offers to change it; see Mode Change Prompts.
Interpolation
| Mode | Description |
|---|---|
| Nearest | No interpolation; shows actual voxel values |
| Linear | Smooth interpolation between voxels |
| Cubic | Applies stronger smoothing for a softer slice display |
Slice View Controller
Each slice view also includes a compact controller for common per-view actions such as reset, zoom, screenshot capture, flip, ruler display, orientation marker settings, visibility options, and background changes.
See 2D View Controller for the full controller reference.
Overlays
The following can be overlaid on 2D views:
| Overlay | Description |
|---|---|
| Masks | Segmentation masks with configurable colors and opacity |
| Measurements | Distance, angle, and other measurements |
| Primitives | ROI shapes and geometric primitives |
| Annotations | Text labels and markers |
Mask Display Options
| Option | Description |
|---|---|
| Color | Set mask overlay color |
| Opacity | Adjust transparency (0-100%) |
| Outline | Show mask boundary only |
| Fill | Show filled mask region |
View Information
Each 2D view displays:
| Information | Location |
|---|---|
| Orientation labels | Corners of the view |
| Axis orientation labels | Center of each viewport edge |
| Slice position | Bottom or top of view |
| Scale/zoom level | Corner of view |
| Hover information at cursor | Status bar, optional tooltip |
Hover Information
The Voxel Information control offers four display modes: None, Status Bar, Mouse Hover, and Both.
When the current mode includes Status Bar, each 2D view reports the world position, voxel index, and gray value under the mouse pointer in the status bar.
If the cursor is over a visible single-label mask, the hover text also includes that mask name.
If the cursor is over a visible multi-label mask, the hover text includes the mask name plus the label information for the label under the cursor. If that label has an annotation, the annotation is shown with the label number. Otherwise, only the label number is shown.
When the current mode includes Mouse Hover, the same hover information is shown next to the mouse pointer in a shorter multi-line format without the world position.
Axis Orientation Labels
Edge-center orientation labels are shown by default. Toggle them from the Visibility menu in any 2D view controller. When enabled, each slice view shows the positive and negative direction of its two in-plane axes at the midpoint of the four edges.
Medical orientations use anatomical shorthand: R, L, A, P, S, I. Engineering orientations use signed axis labels: +X, -X, +Y, -Y, +Z, -Z.
Changing the scene orientation changes which axis and direction appear on each edge
The orientation labels update automatically when the scene orientation is changed and are controlled independently of the corner annotations.
Context Menu
Right-click in a 2D view to access:
- 3D Contours controls for mask preview, surfaces, and volume meshes in the slice views
- Crosshair toggle
- Window/Level controls
- Voxel Information menu with None, Status Bar, Mouse Hover, and Both
- Slice Display menu with Standard, Gray Value Intervals, and Gray Value Intervals with Opacity
- Link Slice Views toggle
- 3D Slice Plane menu, holding everything the clicked slice puts into the 3D view:
- Show in 3D View to show or hide the slice of the clicked view as a plane in the 3D view
- Use as Clip Plane with Off, Keep Front, and Keep Back, to cut the objects of the 3D view open at this slice. Choosing Keep Front or Keep Back also shows the plane, because a plane only cuts while it is shown
- Show All Slice Planes or Hide All Slice Planes to show or hide the slice planes of every volume in the 3D view
- Locate to set the reslice cursor center at the clicked position when the click is inside the image bounds
- Match 3D to Slice to orient the 3D camera to the current slice view
- Copy to Clipboard to copy an image of the clicked view to the system clipboard
Synchronization
Views can be synchronized in several ways:
| Sync Option | Description |
|---|---|
| Position | Crosshair position linked across views |
| Zoom | Zoom level synchronized |
| Window/Level | Display settings synchronized |
Use the crosshair with Alt+mouse movement for dynamic exploration of anatomical structures across all three orthogonal planes simultaneously.
Related Topics
- The 3D View – 3D visualization
- 2D View Controller – Controller overlay for each slice view
- Slice Views Tab – Slice view settings in the View ribbon
- Volume Grayscale Image – Understanding volume data
- Masks – Segmentation overlays